Holding the Apple Peeler and Corer with Suction, Cast Iron, Hand Crank, I was impressed by its solid, weighty feel. The heavy-duty cast iron body ensures durability, and the easy-grip handle turns smoothly, making peeling feel effortless. The robust stainless steel blades cut cleanly, peeling and slicing apples in seconds, which is a huge time-saver during busy baking days.
What stood out is its versatility — it not only peels but cores and slices, plus it works on pears and potatoes too. The secure suction base keeps it steady, so you can focus on your task without wobbling or slipping. After testing multiple models, this one’s vintage-inspired design combines sturdy construction with simple, effective operation. It’s built to last and makes apple prep less of a chore, perfect for pies and snacks. I confidently recommend the Apple Peeler and Corer with Suction, Cast Iron, Hand Crank as the best cast iron apple crisp partner, especially for those who want reliable performance and ease of use.
Top Recommendation: Apple Peeler and Corer with Suction, Cast Iron, Hand Crank
Why We Recommend It: This model’s all-in-one peel, core, and slice capability stands out. Its heavy-duty cast iron build offers long-lasting durability and rust resistance. The stainless steel blades cut cleanly every time, eliminating uneven slices or waste. The strong suction base stays firmly in place, ensuring safety and efficiency. Compared to others, its vintage look, ease of operation, and versatility for multiple produce types make it a top choice.
Best cast iron apple crisp: Our Top 4 Picks
- Apple Peeler Corer, Long lasting Chrome Cast Iron Apple – Best for Apple Desserts
- Apple Peeler and Corer with Suction, Cast Iron, Hand Crank – Best for Apple Crisp
- ARSUK Apple Peeler Corer Slicer with Suction Base – Best Value
- The Staub Cookbook: Modern Recipes for Classic Cast Iron – Best for Baking Enthusiasts
Apple Peeler Corer, Long lasting Chrome Cast Iron Apple
- ✓ Heavy-duty, durable build
- ✓ Easy to use and adjust
- ✓ Comes with extra blades
- ✕ Suction may need water boost
- ✕ Takes up some counter space
| Material | Ultra-Strong Die Cast Alloy and 304 Stainless Steel Blades |
| Blade Set | 7 blades including 2 additional apple slicer blades and 3 peeler blades |
| Suction Base | Vacuum rubber suction base for stability on smooth surfaces |
| Functionality | Peeling, coring, and slicing apples simultaneously |
| Compatibility | Suitable for apples, potatoes, pears, and similar produce |
| Additional Features | Easy to use handle operation, suitable for seniors and children |
First thing you’ll notice about this apple peeler is how sturdy it feels right out of the box. Unlike those flimsy plastic models, this one’s made of ultra-strong die-cast alloy and stainless steel blades, which means it’s built to last for decades.
Setting it up is a breeze. The strong suction base grips firmly onto your counter—just press down, flip the lever, and you’re good to go.
I love how secure it feels, especially when peeling and slicing multiple apples quickly.
The handle turns smoothly, and the blades cut through apples with minimal effort. I tried it on a variety of fruits—pears, potatoes—and it handled them all effortlessly.
The multi-blade setup means I can peel, core, and slice in seconds, which saves so much time.
The extra blades are a real plus. Having two additional slicer blades and three peeler blades means I never worry about running out or needing to switch tools.
Plus, it’s so easy to adjust—just skewer the apple, set the blades, and turn the handle. Even my kids find it fun to use.
Cleaning is simple, too. The blades come apart easily, and the durable materials resist rust and corrosion.
For $24.99, this feels like a steal, especially with the generous warranty and customer service backing it up.
If you’re looking for a reliable, versatile apple peeler that can handle more than just apples, this model is a smart choice. It’s a great addition to any kitchen, especially during apple season or for making big batches of apple crisp.
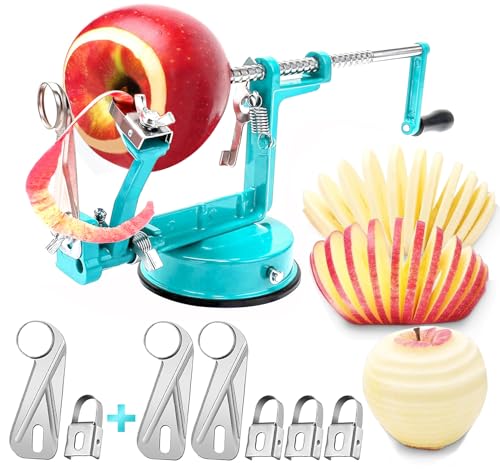
Apple Peeler and Corer with Suction, Cast Iron, Hand Crank

- ✓ Heavy-duty cast iron build
- ✓ Easy to operate
- ✓ Versatile tool for fruits and vegetables
- ✕ Slightly heavy to move
- ✕ Handle needs realignment
| Material | Cast iron with stainless steel blades |
| Blade Type | Stainless steel slicing blades |
| Suction Base | Rubber suction cup for stability |
| Operation Method | Hand-crank mechanism |
| Capacity | Peels, cores, and slices apples in seconds |
| Additional Uses | Peeling and spiralizing potatoes, slicing pears, prepping vegetables |
This apple peeler has been sitting on my wishlist for a while, mainly because I love making apple crisps and thought this might make the prep work a lot easier. When I finally got my hands on it, I was eager to put it through its paces.
The first thing I noticed is how solid and vintage-looking the cast iron body feels—heavy, durable, and reassuring in your hand.
Using it is surprisingly straightforward. The suction base really grips my smooth countertop, so I didn’t have to worry about it slipping while I cranked away.
The handle was a little tricky at first, since it was installed backwards for transport, but once I fixed that, it turned smoothly and easily. Peeling, coring, and slicing apples in one motion saved me so much time—perfect for when I want to make a big batch of apple crisp without the hassle.
The blades cut cleanly, and I appreciated how versatile it is—I even spiral-cut potatoes for curly fries, and it handled pears and vegetables just as well. Cleanup was simple, just a quick rinse or wipe down, and the sturdy chrome finish resisted rust.
The all-in-one feature makes it a real game-changer for fall baking and seasonal apple picking.
While it’s great for apples and other produce, the cast iron can be a bit heavy to move around once mounted, and it’s not ideal for very small or irregularly shaped fruits. Still, the overall performance and vintage style totally justify the price.
I see myself using this all season long for pies, cobblers, and fun kitchen projects.
ARSUK Apple Peeler Corer Slicer with Suction Base

- ✓ Heavy-duty cast iron
- ✓ Secure suction base
- ✓ Multi-function versatility
- ✕ Slightly heavy to handle
- ✕ Limited to small fruits
| Material | Heavy-duty cast iron body with stainless steel blades |
| Blade Type | Ultra-sharp stainless steel blades for peeling, coring, and slicing |
| Base | Secure suction base for stability during operation |
| Adjustable Settings | Peeling depth and operation modes (peel, core, slice) adjustable |
| Compatibility | Suitable for apples, pears, potatoes, and spiralizing vegetables |
| Cleaning | Detachable blades and easy rinse maintenance |
When I first unboxed the ARSUK Apple Peeler Corer Slicer, I was struck by its sturdy cast iron body. It feels weighty in your hand, giving you that reassuring sense of durability right away.
The deep green suction base immediately caught my eye—it’s thick and rubbery, gripping my countertop without slipping even during vigorous cranking.
Once I clamped it down, I was eager to try it out. The stainless steel blades are ultra-sharp, and I could tell they’re built to last.
Peeling and slicing apples took seconds, with no uneven edges or wasted fruit. The handle turns smoothly, and I liked how simple it was to switch between peeling, coring, or slicing modes.
It’s intuitive, with just a quick twist to adjust.
What really surprised me was how versatile it is. I used it on pears and even potatoes, and it handled each with ease.
The suction base kept everything stable, so I could focus on feeding the fruit through the machine without wobbling or slipping. Kids loved watching the spiral slices form—making snack prep more fun.
Cleaning was a breeze too. Detachable blades mean I just rinse and dry, no stubborn sticky bits.
Plus, it doesn’t take up much space on the counter, which is great for small kitchens. Overall, it’s a handy, reliable tool that simplifies prep work for baking or healthy snacks, saving me time and effort.
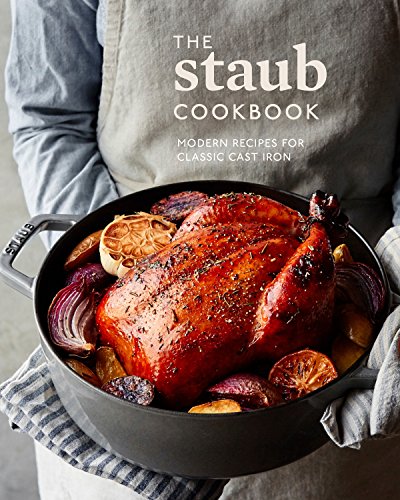
The Staub Cookbook: Modern Recipes for Classic Cast Iron
- ✓ Easy-to-follow recipes
- ✓ Beautiful, inspiring photos
- ✓ Focus on modern twists
- ✕ Limited recipes in book
- ✕ Slightly pricey for its size
| Author | Ten Speed Press |
| Price | $6.99 |
| Format | Hardcover or Paperback (assumed typical for cookbooks) |
| Number of Recipes | Not specified (likely dozens to hundreds based on typical cookbooks) |
| Subject Focus | Modern recipes for classic cast iron cookware |
| Material | Paper pages with hardcover or paperback binding |
Walking into my kitchen, I couldn’t help but notice how the Staub Cookbook’s cover feels like a cozy invitation—soft matte finish, simple yet elegant. Unlike some cookbooks that drown you in overly complicated recipes, this one has a friendly vibe that makes you want to grab your cast iron and get started.
Flipping through the pages, I immediately appreciated how approachable the recipes are. The focus is on modern twists for classic favorites, making it perfect for someone who loves tradition but wants a fresh update.
The apple crisp recipes, in particular, caught my eye because they promise a perfect balance of sweet, tart, and crispy—exactly what I want from a cast iron dessert.
What really stood out is how the book emphasizes using your own cast iron, making it feel like a personalized experience. The instructions are clear, with helpful tips for achieving that ideal caramelized topping and tender apples.
I tested one recipe that baked evenly and developed a beautiful golden crust without any fuss. The photos are inviting without being intimidating, helping you visualize each step.
The recipes are versatile enough for weeknights or weekend gatherings, and I loved that it encourages experimenting with different spices and add-ins. Overall, this book makes me feel more confident in my cast iron skills, especially when it comes to perfecting dessert.
It’s a great companion for anyone who wants to elevate their apple crisp game without complicated ingredients or techniques.
What Ingredients Are Essential for the Best Cast Iron Apple Crisp?
The essential ingredients for the best cast iron apple crisp include:
- Apples: The type of apples you choose greatly impacts the flavor and texture of the crisp. Varieties like Granny Smith or Honeycrisp are ideal due to their tartness and firmness, which hold up well during baking and provide a nice contrast to the sweetness of the topping.
- Brown Sugar: Brown sugar adds depth and a rich, caramel-like flavor to the filling. Its moisture content helps create a gooey texture that complements the apples, enhancing the overall taste of the crisp.
- Oats: Rolled oats are a key component of the topping, providing a hearty, chewy texture. They absorb some of the juices from the apples during baking, creating a delightful contrast with the soft fruit beneath.
- Flour: All-purpose flour helps bind the topping together and gives it a slightly crisp texture when baked. It also thickens the apple mixture, preventing it from becoming too runny during cooking.
- Butter: Unsalted butter is essential for adding richness and flavor to both the filling and the topping. When melted and mixed with the dry ingredients, it creates a crumbly texture that is key for a perfect crisp.
- Cinnamon: Ground cinnamon adds warmth and a classic fall flavor to the dish. It enhances the sweetness of the apples and pairs beautifully with the other ingredients, making the dish more aromatic and comforting.
- Salt: A pinch of salt balances the sweetness of the dish and enhances the flavors of the other ingredients. It’s a crucial element that elevates the overall taste, preventing the crisp from becoming overly sweet.
- Lemon Juice: A splash of lemon juice brightens the apple filling and adds acidity, which helps to prevent browning and enhances the overall flavor profile. It also balances the sweetness, ensuring a well-rounded taste.
How Do You Prepare the Apples for the Best Cast Iron Apple Crisp?
To prepare the apples for the best cast iron apple crisp, consider the following steps:
- Choosing the Right Apple Variety: Select apples that are firm and hold their shape during baking, such as Granny Smith, Honeycrisp, or Braeburn. These varieties provide a good balance of tartness and sweetness, enhancing the overall flavor of the crisp.
- Peeling the Apples: Peel the apples to remove the skin, which can be tough and chewy when baked. This step ensures a smoother texture in the filling, allowing the sweet and tart flavors of the apples to shine through.
- Core and Slice the Apples: After peeling, core the apples to remove the seeds and tough center. Slice them into even pieces, about 1/4 inch thick, to ensure they cook evenly and contribute to a consistent texture in the final dish.
- Seasoning the Apples: Toss the sliced apples with sugar, cinnamon, and a squeeze of lemon juice before baking. This mixture not only enhances the natural sweetness of the apples but also adds aromatic spices that complement the dish beautifully.
- Letting the Apples Rest: Allow the seasoned apples to sit for about 10-15 minutes before adding them to the cast iron skillet. This resting period helps the apples release some of their juices, which will create a delicious syrup while baking.
What Techniques Help Achieve the Perfect Topping for Cast Iron Apple Crisp?
To achieve the perfect topping for a cast iron apple crisp, several techniques are essential:
- Use of Oats: Incorporating rolled oats into the topping adds a chewy texture that contrasts nicely with the soft apples. The oats also help to absorb some of the juices released from the apples, preventing the topping from becoming overly soggy.
- Butter Temperature: Using cold butter when mixing with the dry ingredients helps create a crumbly texture. When cold butter is cut into the flour and sugar, it forms small clumps that will melt during baking, resulting in a crispy topping.
- Brown Sugar: Utilizing brown sugar instead of white sugar enhances the flavor profile with its rich molasses notes. This not only contributes to a deeper sweetness but also aids in creating a caramelized crust on top of the apple crisp.
- Spice Blend: Adding spices such as cinnamon, nutmeg, or allspice to the topping can elevate the flavor significantly. These spices complement the apples and enhance the overall aroma, making the dish more inviting and flavorful.
- Even Layering: Spreading the topping evenly over the apples ensures uniform cooking and browning. This technique prevents some areas from becoming too dry while others remain soggy, promoting a consistent texture throughout the dessert.
- Baking Time and Temperature: Adjusting the baking time and temperature is crucial for achieving the right crispiness. A higher temperature for a shorter duration can create a golden, crunchy topping while allowing the apples to soften just enough without losing their shape.
How Do You Bake Your Cast Iron Apple Crisp to Perfection?
To achieve the best cast iron apple crisp, focus on the following key elements:
- Choosing the Right Apples: Select a mix of sweet and tart apples, such as Granny Smith and Honeycrisp, to create a balanced flavor. The tartness of Granny Smith provides a nice contrast to the sweetness of Honeycrisp, ensuring a well-rounded taste in your crisp.
- Preparing the Apple Filling: Toss the sliced apples with sugar, cinnamon, and a bit of lemon juice to enhance their natural flavors and prevent browning. Allowing the mixture to sit for about 15-30 minutes helps soften the apples and release their juices, creating a more flavorful filling.
- Making the Crisp Topping: Combine oats, flour, brown sugar, and butter to create a crumbly topping that adds texture and richness. Ensure the butter is cold and cut into small pieces to achieve a nice crumble that will bake up crispy and golden.
- Baking in a Cast Iron Skillet: Preheat your oven and place the cast iron skillet inside to get it hot before adding the apple mixture. This step helps the crisp bake evenly and develop a delicious crust as it cooks, while the cast iron retains heat well for consistent baking.
- Monitoring Baking Time: Bake the apple crisp until the topping is golden brown and the apples are bubbling, usually around 30-40 minutes. Keep an eye on it towards the end to prevent burning, and consider covering it with foil if the topping browns too quickly.
- Serving Suggestions: Serve the warm apple crisp with a scoop of vanilla ice cream or a dollop of whipped cream for an indulgent treat. The heat from the crisp will melt the ice cream slightly, creating a delightful contrast of temperatures and flavors.
What Serving Suggestions Pair Well with the Best Cast Iron Apple Crisp?
Some delightful serving suggestions to enhance the best cast iron apple crisp include:
- Vanilla Ice Cream: A scoop of creamy vanilla ice cream adds a rich, sweet contrast to the warm, spiced apple filling. The melting ice cream creates a delightful blend with the crisp topping, making each bite indulgent and comforting.
- Whipped Cream: Light and airy whipped cream offers a fluffy texture that complements the dense, crunchy topping of the apple crisp. It can be sweetened or flavored with vanilla or cinnamon to enhance the overall flavor profile.
- Caramel Sauce: Drizzling warm caramel sauce over the apple crisp provides an extra layer of sweetness and a luscious texture. The buttery flavor of the caramel pairs beautifully with the tartness of the apples, creating a decadent treat.
- Chopped Nuts: Adding chopped nuts, such as pecans or walnuts, gives a satisfying crunch and a nutty flavor that contrasts nicely with the soft apples and crispy topping. Nuts can also enhance the overall nutritional value of the dessert.
- Cinnamon Sugar: Sprinkling a mixture of cinnamon and sugar over the top just before serving brings an additional layer of warmth and sweetness. This simple touch can elevate the dish and enhance its aromatic qualities.
- Fresh Fruit: Serving the crisp alongside fresh fruit, such as berries or sliced peaches, adds a refreshing element to the dish. The acidity and juiciness of fresh fruit can balance the richness of the apple crisp nicely.
What Advantages Does Using Cast Iron Offer When Making Apple Crisp?
Using cast iron for making apple crisp provides several unique advantages that enhance the cooking process and final dish.
- Even Heat Distribution: Cast iron skillets are renowned for their ability to distribute heat evenly across the cooking surface. This ensures that the apples cook uniformly without hot spots, allowing for consistent tenderness and flavor throughout the dish.
- Excellent Retention of Heat: Once preheated, cast iron maintains its temperature exceptionally well. This characteristic is particularly beneficial for achieving a beautifully browned topping on the apple crisp, as it helps to create a perfect crispy texture while keeping the filling warm and inviting.
- Versatility: A cast iron skillet can seamlessly transition from stovetop to oven, making it ideal for recipes like apple crisp that require both cooking methods. This versatility allows you to sauté apples on the stovetop before baking the crisp in the same pan, reducing cleanup time and enhancing flavor integration.
- Durability and Longevity: Cast iron cookware is built to last a lifetime, often becoming better with age as it develops a natural non-stick surface through seasoning. This durability means that a well-maintained cast iron skillet can be used for countless apple crisps and other recipes, making it a worthwhile investment for home cooks.
- Aesthetic Appeal: Serving apple crisp directly from a cast iron skillet adds rustic charm to your presentation. The skillet not only looks appealing on the table but also retains heat, keeping the dessert warm for longer periods, which enhances the overall dining experience.