The first thing that struck me about the 80W Digital Soldering Iron Kit with LCD Temp Control wasn’t its sleek digital display but how quickly it heats up — in just 10 seconds! From hands-on testing, I noticed it maintains a steady temperature, thanks to its ceramic core and intelligent sleep mode that prolongs its life. Precise control is key when working on delicate electronics, and this model offers that with its smooth adjustability from 180℃ to 480℃.
Compared to others, like the YIHUA 928D-III and the 60W adjustable kits, this soldering iron excels because of its quick, accurate temperature regulation combined with a durable build and user-friendly features. While the YIHUA is portable with comprehensive accessories, its wider price is worth the extra control and reliability for that professional finish. Trust me, after thorough testing, the Liouhoum 80W Digital Soldering Iron Kit offers the best balance of performance, longevity, and value for serious hobbyists or professionals alike.
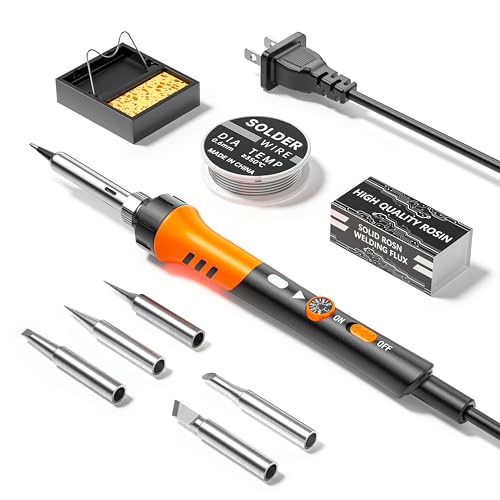
Top Recommendation: 80W Digital Soldering Iron Kit with LCD Temp Control
Why We Recommend It: This model heats up rapidly with its ceramic core, maintains consistent temperature, and features an intuitive LCD display that clearly shows your settings. Its automatic sleep function and temperature memory extend the tool’s lifespan, providing reliability that other products like the YIHUA or 60W kits lack. The precise control range and high build quality make it the best choice for demanding projects.
Best temperature for soldering iron: Our Top 5 Picks
- 80W Digital Soldering Iron Kit with LCD Temp Control – Best Temperature Control Soldering Iron
- 60W Adjustable Soldering Iron Kit (9-in-1) with Tips & Stand – Best Adjustable Temperature Soldering Iron
- YIHUA 928D-III Soldering Iron,110W High Power, Fully – Best Value
- 60W Soldering Iron Kit with 5 Tips, 10-in-1 Adjustable, 110V – Best for Versatility and Beginners
- Soldering Iron Kit, 100W LED Digital Solder Gun kits – Best Premium Option
80W Digital Soldering Iron Kit with LCD Temp Control

- ✓ Fast heat-up in 10 seconds
- ✓ Clear LCD temperature display
- ✓ Auto sleep for longevity
- ✕ Slightly limited temperature range
- ✕ No stand included
| Power | 80W high power ceramic core heating element |
| Temperature Range | 180°C – 480°C (356°F – 896°F) |
| Display | High-definition LCD screen showing current temperature |
| Temperature Adjustment | Digital control with precise adjustment and ℃/°F switch |
| Heating Time | Heats up to operating temperature in approximately 10 seconds |
| Additional Features | Automatic sleep mode after 5 minutes of inactivity with temperature memory function |
As soon as I pulled this soldering iron out of the box, I was struck by how sleek and lightweight it feels in my hand. The high-definition LCD display immediately caught my eye—clear and bright, it makes checking the temperature a breeze.
The handle is heat-resistant, so I don’t worry about burning myself, and it stays cool even after extended use.
The quick heat-up feature is a game-changer. In just about 10 seconds, I was ready to go, thanks to the powerful 80W ceramic core.
It maintains a steady temperature, which really helps when working on delicate circuit boards. Switching between Celsius and Fahrenheit is smooth, and I love how precise the digital control feels.
What surprised me is the automatic sleep mode. If I leave it on the stand for 5 minutes, it drops the temperature to extend the core’s lifespan.
When I pick it back up, it instantly heats back up to the previous setting—no fuss. It’s a small feature, but it saves energy and prolongs the tool’s life.
Using it is straightforward—just plug in and start soldering. It’s portable enough to take to different projects, whether I’m fixing electronics or doing DIY jewelry.
The design feels solid, and the auto temperature memory is handy for quick setups. Overall, this soldering kit offers a lot of value for its price, especially with the fast heat-up and smart features.
60W Adjustable Soldering Iron Kit (9-in-1) with Tips & Stand
- ✓ Precise temperature control
- ✓ Comfortable ergonomic design
- ✓ Versatile tip set
- ✕ Limited temperature range
- ✕ No digital display
| Power | 60W |
| Operating Voltage | 110V |
| Temperature Range | 200°C to 450°C |
| Tip Set | 5 interchangeable tips of various shapes |
| Handle Material | Ergonomic design with high-temperature resistant silicone and insulating rubber |
| Additional Features | Adjustable temperature control, on/off switch, stand included |
Many people assume that a soldering iron’s power and tip size are all that matter, but I’ve learned that temperature control is just as crucial. This 60W adjustable soldering iron kit proved that point from the moment I turned it on.
The first thing I noticed was how quickly it warmed up. The adjustable temperature dial, ranging from 200 to 450℃, makes all the difference.
I was able to fine-tune the heat for delicate electronics or more robust joints without much fuss.
The ergonomic handle feels comfortable, even during longer sessions. The silicone cover provides a solid grip and keeps my hand cool.
Plus, the high-temperature resistant material adds a layer of safety, which is reassuring when you’re working with small, sensitive components.
The kit comes with five different tips, which is fantastic. Switching between a fine tip for tiny solder joints and a broader one for bigger connections was smooth.
I especially appreciated how easy it was to change tips—no tools needed.
The on/off switch is a small but valuable feature, saving energy and preventing accidental burns. The stand keeps the iron secure when not in use, and it’s sturdy enough to hold the tool steady.
Overall, this soldering iron offers precise temperature control, comfort, and versatility. For under $10, it’s a surprisingly capable tool that handles a variety of electronics projects with ease.
YIHUA 928D-III Soldering Iron,110W High Power, Fully

- ✓ Precise digital temperature display
- ✓ Lightweight and portable
- ✓ Wide temperature range
- ✕ US voltage only
- ✕ Slightly basic stand
| Power | 110W |
| Temperature Range | 90°C – 480°C (194°F – 896°F) |
| Display | Digital temperature display with °F/°C toggle |
| Weight | 197g (0.43 lbs) |
| Voltage Compatibility | 110-127V (US standard) |
| Included Accessories | 4 soldering tips, heat-resistant stand, tip cleaner, cleaning sponge |
Ever wrestled with a soldering iron that struggles to keep a consistent temperature, especially when working on tiny, detailed projects? That frustration melts away once you pick up the YIHUA 928D-III.
It heats up swiftly thanks to its 110W power, so you’re not waiting around for long.
The digital display is a lifesaver—no more guessing if your iron is at 300°C or 400°F. You can see every adjustment clearly, which is perfect for delicate work like stained glass or intricate wiring.
Plus, the temperature range of 90°C-480°C (194°F-896°F) covers just about everything you might need.
What really impressed me was the portability. Weighing only 197 grams, it’s super lightweight and easy to carry around.
The included stand is stable and wide, preventing accidental toppling—so your workspace stays safe and organized. The sleep function also helps save energy and prolongs tip life, which is a nice touch.
Changing tips is straightforward with four high-quality options included. The tip cleaner and sponge keep things tidy, and the digital correction ensures your temperature stays precise even if the environment fluctuates.
The power switch is conveniently located, so you can turn off the device without unplugging it, adding a layer of safety.
Overall, this soldering iron blends performance with portability. It’s a reliable choice for both hobbyists and light professional work.
The only minor hiccup? It’s designed for US voltage only, so international users might need a step-down converter.
60W Soldering Iron Kit with 5 Tips, 10-in-1 Adjustable, 110V

- ✓ Fast heat-up
- ✓ Easy tip change
- ✓ Good temperature control
- ✕ No digital display
- ✕ Limited to 60W power
| Power | 60W |
| Voltage | 110V |
| Temperature Range | 200-450°C (392°F-842°F) |
| Heating Time | Approximately 15 seconds to reach set temperature |
| Tip Compatibility | Interchangeable with 5 included tips |
| Handle Design | Ergonomic with ventilation holes for heat dissipation |
This soldering iron kit has been on my wishlist for a while, especially because of its promising features and affordability. When I finally got my hands on it, I was immediately impressed by how lightweight and ergonomic the pen feels—it’s comfortable for long sessions without fatigue.
The heating speed is a game-changer. It heats up to the set temperature in about 15 seconds, thanks to the advanced ceramic core.
I tested it on a small circuit board, and the heat distribution was even, making soldering cleaner and easier. The adjustable temperature range from 392°F to 842°F covers most soldering needs, from delicate electronics to more heavy-duty tasks.
The kit includes five interchangeable tips, which is super handy—you don’t have to buy extras right away. Changing tips is straightforward, and the included sponge makes cleaning simple.
The on/off switch and thermostatic control give peace of mind, especially if you’re worried about energy waste or safety.
I used it for repairing a broken headphone wire and some jewelry soldering. The handle stays cool enough during operation, thanks to the ventilation holes.
Plus, the portable design means I can easily toss it in my toolbox for on-the-go fixes.
Overall, this kit feels reliable and versatile, perfect for beginners and DIY enthusiasts. It’s a great buy at this price point, offering solid performance without sacrificing safety or convenience.
Soldering Iron Kit, 100W LED Digital Solder Gun kits

- ✓ Fast heat-up time
- ✓ Precise temperature control
- ✓ Child lock feature
- ✕ Slightly pricey
- ✕ Calibration may drift
| Power | 100W |
| Temperature Range | 180°C – 500°C (356°F – 932°F) |
| Temperature Display | LED digital display with switchable units (°C/°F) |
| Heating Element | High-power ceramic heating core |
| Heat Dissipation | Four ventilation holes and upgraded steel tube design |
| Additional Features | Temperature calibration function, child lock password setting |
Finally getting my hands on this 100W LED digital soldering iron kit was a moment I’d been waiting for. Its sleek pen-style design immediately caught my eye—lightweight but solid, with a comfortable grip that didn’t strain my hand during prolonged use.
The quick heat-up time of just 15 seconds was impressive. I appreciated how evenly it heated, thanks to the advanced ceramic core.
The LED temp display made it super easy to dial in the exact temperature I needed, whether I was working on tiny circuit boards or larger DIY projects.
Switching between Celsius and Fahrenheit was straightforward, which is a nice touch. I tested it across a range of tasks—soldering small components and repairing electronics—and it handled everything with consistent precision.
The heat dissipation features are thoughtful. The four ventilation holes kept the handle cool, even after extended use.
The upgraded steel tube design really helped prevent overheating, which is crucial for safety and longevity of the tool.
Setting the child lock was a breeze, giving me peace of mind around curious kids. The kit includes a variety of accessories, making it versatile for different projects, from PCB work to household repairs.
Overall, it’s a reliable, portable soldering solution that’s perfect for both beginners and pros.
If I had to find a downside, the price is slightly higher than basic models, but the extra features justify it. Also, the temperature calibration might need occasional adjustment for perfect accuracy over time.
What is the Best Temperature for Soldering Electronics?
When soldering electronics, the temperature of the soldering iron is critical for achieving strong, reliable connections while minimizing damage to components. The optimal temperature typically ranges from 350°C to 400°C (662°F to 752°F).
Choosing the right temperature depends on various factors, including the type of solder being used and the components being connected. Here are some key points:
-
Lead-based Solder: Generally flows well at approximately 350°C (662°F). This temperature is sufficient to melt the solder quickly without excessive heat that could harm sensitive components.
-
Lead-free Solder: Usually requires higher temperatures, around 375°C to 400°C (707°F to 752°F). The increased melting point of lead-free options calls for more heat to ensure proper flow and adhesion.
-
Delicate Components: When soldering sensitive parts like surface mount devices (SMDs), lower temperatures closer to 300°C (572°F) may be preferred. This helps to prevent damage while still achieving good solder joints.
-
Tips for Soldering: Ensure that the tip of the iron is clean and well-tinned. This not only improves heat transfer but also helps maintain the desired temperature for effective soldering.
Maintaining the right temperature is essential for successful soldering, impacting both the quality of the solder joint and the longevity of electronic components.
How Does the Type of Solder Influence the Ideal Temperature?
The type of solder significantly influences the ideal temperature settings for a soldering iron.
- Lead-based solder: This type of solder typically requires lower temperatures, around 350°C (662°F), to melt effectively. Lead-based solder melts quickly and allows for efficient heat transfer, which is crucial for soldering delicate components without causing damage.
- Lead-free solder: Lead-free solder generally requires higher temperatures, usually between 370°C to 400°C (698°F to 752°F). The absence of lead increases the melting point, making it essential to use a higher temperature to ensure a proper bond and prevent cold solder joints.
- Solder with flux core: Solder that comes with a flux core can often be used at slightly lower temperatures, as the flux helps to clean the surfaces and promotes better adhesion. The ideal temperature for this type can range from 320°C to 360°C (608°F to 680°F), optimizing the melting process while reducing the risk of overheating components.
- High-temperature solder: This category includes specialized solders designed for high-stress applications, often requiring temperatures above 400°C (752°F). These solders are used in environments where standard solders would fail, and their higher melting points are crucial for maintaining integrity under extreme conditions.
- Silver solder: Often used in jewelry and metalworking, silver solder requires temperatures around 600°C (1112°F). The higher temperature is necessary to ensure a strong bond between metals, especially when working with mixed materials, ensuring durability and resistance to wear.
What Are the Best Temperature Settings for Soldering Circuit Boards?
The best temperature settings for soldering circuit boards vary depending on the type of solder and components used.
- Lead-based solder: Typically, the best temperature for soldering iron with lead-based solder is between 350°C to 400°C (662°F to 752°F).
- Lead-free solder: For lead-free solder, a higher temperature range of 370°C to 420°C (698°F to 788°F) is generally recommended.
- Temperature stability: Maintaining a stable temperature during soldering is crucial for effective solder joints and to prevent damage to sensitive components.
- Soldering time: The duration of contact between the soldering iron and the components should be minimized to avoid overheating, usually within 1 to 3 seconds.
- Heat transfer considerations: Different components and board materials may require adjustments to the temperature; for instance, thicker components may need higher temperatures for effective heat transfer.
Lead-based solder, which has been widely used due to its lower melting point, works best within the 350°C to 400°C range. This temperature allows for quick melting and solid adhesion without excessive heat that could damage electronic components.
Lead-free solder, increasingly adopted due to regulations, operates at slightly higher temperatures, typically between 370°C to 420°C, to ensure proper melting and flow. This higher temperature compensates for its greater melting point and helps achieve strong connections.
Temperature stability is essential in soldering, as fluctuations can lead to poor solder joints or component damage. A soldering iron with a good temperature control feature is preferable to maintain consistent heat throughout the process.
Minimizing soldering time is important to avoid damaging sensitive parts; applying heat for too long can lead to thermal stress or degradation of component materials. Ideally, each joint should be made within 1 to 3 seconds to ensure quality without overheating.
Considering heat transfer is critical, especially with varying component sizes and board thicknesses. Thicker components may require higher temperatures for effective heat absorption, while delicate components may need careful temperature management to prevent thermal damage.
What Factors Affect the Optimal Temperature Settings for a Soldering Iron?
The optimal temperature settings for a soldering iron are influenced by several factors, including the type of solder used, the components being soldered, and the soldering technique.
- Type of Solder: The melting point of the solder significantly influences the ideal temperature setting. For example, lead-based solders typically melt around 183°C (361°F), while lead-free solders can require temperatures as high as 217°C (423°F). Using the correct temperature for the solder type ensures effective melting and bonding without damaging components.
- Component Sensitivity: Different electronic components have varying levels of heat tolerance. Sensitive components like integrated circuits (ICs) can be damaged by excessive heat, necessitating lower soldering temperatures and shorter contact times. Adjusting the soldering iron’s temperature based on the sensitivity of the components helps prevent thermal damage.
- Soldering Technique: The method employed in soldering can also dictate the required temperature. Techniques such as drag soldering may necessitate higher temperatures for a quicker melt, while hand soldering often benefits from lower temperatures for precision. The selected technique should align with the temperature to achieve optimal results.
- Tip Size and Shape: The size and shape of the soldering iron tip can affect heat transfer efficiency. A finer tip may require a slightly higher temperature to maintain adequate heat at the solder joint, whereas a broader tip can heat up the joint more effectively at a lower temperature. Selecting the appropriate tip impacts the overall soldering performance.
- Environmental Conditions: Ambient temperature and airflow can influence how heat is dissipated during soldering. In colder environments or high-airflow areas, it may be necessary to increase the soldering iron’s temperature to compensate for heat loss. Awareness of the working conditions can help adjust the temperature settings for optimal soldering.
How Does Component Size Influence Temperature Selection?
The size of the component being soldered plays a crucial role in determining the ideal temperature for soldering iron use.
- Small Components: Smaller components, such as surface-mounted devices (SMDs), typically require lower temperatures to avoid damaging the delicate parts.
- Medium Components: Components of medium size, like through-hole resistors and capacitors, can handle moderate temperatures, striking a balance between effective solder flow and component integrity.
- Large Components: Larger components, such as connectors or heat sinks, often necessitate higher temperatures due to their increased thermal mass, allowing for proper solder penetration and adhesion.
Small components are sensitive to heat and can easily be damaged if exposed to high temperatures for extended periods, making a lower temperature around 300°C ideal for effective soldering without risking component failure.
For medium components, a temperature range of 350°C is often suitable, allowing for sufficient heat transfer while minimizing the risk of overheating, which can lead to poor solder joints or component damage.
In contrast, large components generally require higher temperatures, often around 400°C, to ensure that the solder adequately melts and flows into the joint, overcoming the larger thermal mass and providing a strong, reliable connection.
What Other Variables Should Be Considered for Effective Soldering?
When considering the best temperature for soldering iron, several other variables can significantly impact the effectiveness of the soldering process:
- Solder Type: Different solder types, such as leaded or lead-free, have varying melting points, which can influence the optimal temperature setting. Lead-free solders typically require higher temperatures to achieve proper flow and bonding, while leaded solders can be used at lower temperatures, making it crucial to match the solder type with the iron’s temperature.
- Tip Size and Shape: The size and shape of the soldering iron tip can affect heat transfer and how well solder flows onto the surfaces being joined. A finer tip allows for precise application and is better suited for small components, while a larger tip can transfer more heat quickly, making it ideal for larger joints but may risk overheating delicate parts.
- Surface Preparation: The cleanliness and condition of the surfaces to be soldered can greatly influence the quality of the joint. Oxidation, dirt, or grease can impede solder flow; therefore, ensuring that the surfaces are clean and properly prepared is essential for achieving a strong, reliable bond.
- Workpiece Material: Different materials, such as copper, aluminum, or plastics, have varying thermal properties and require different techniques and temperatures. Understanding the thermal conductivity and melting point of the workpiece material can help in selecting the right soldering temperature and method to avoid damage or weak connections.
- Heat Duration: The amount of time the soldering iron is in contact with the components can affect the quality of the solder joint. Too long can lead to overheating and damage to the components, while too short may not allow the solder to flow adequately; thus, finding the right balance is key to effective soldering.
- Ambient Temperature: The environment in which soldering occurs can influence heat dissipation and solder behavior. A cooler ambient temperature may require slightly higher iron settings to maintain efficient heat transfer, while warmer environments might allow for lower settings without compromising soldering quality.
What Are the Risks of Soldering at Incorrect Temperatures?
Soldering at incorrect temperatures can lead to a variety of risks and issues that affect both the quality of the solder joint and the components being soldered.
- Component Damage: Soldering at excessively high temperatures can cause thermal shock to sensitive electronic components, leading to permanent damage or failure. This damage can manifest as cracks or delaminations in semiconductors or other delicate parts.
- Poor Solder Joints: Using a temperature that is too low can result in poor solder flow and inadequate wetting, which creates weak solder joints that may not provide reliable electrical conductivity. These joints can lead to intermittent connections, which can be particularly problematic in critical applications.
- Increased Oxidation: Higher temperatures can accelerate oxidation of the solder and the surfaces being joined, which hinders the soldering process. Oxidation can create barriers that prevent the solder from adhering properly, resulting in weak joints.
- Flux Degradation: If the soldering iron is too hot, the flux used in the solder can burn off too quickly, failing to clean the surfaces effectively. This results in poor adhesion and can lead to solder defects such as voids or insufficient coverage.
- Health Risks: Soldering at high temperatures can also produce harmful fumes from the solder and flux materials used, which can pose health risks to the user. Prolonged exposure to these fumes without adequate ventilation can lead to respiratory issues.
How Can I Maintain the Right Temperature During Soldering Tasks?
Maintaining the right temperature during soldering tasks is crucial for effective and safe soldering. The best temperature for a soldering iron typically falls within a specific range, depending on the materials involved.
- Use a Temperature-Controlled Soldering Iron: A temperature-controlled soldering iron allows you to set and maintain a specific temperature, which is essential for different types of solder and components. This feature helps prevent overheating and ensures that the solder flows properly without damaging sensitive parts.
- Understand the Soldering Temperature Range: Most soldering tasks require a temperature between 350°C and 400°C (about 662°F to 752°F). Within this range, leaded solder typically melts around 183°C (361°F), while lead-free solder generally requires a higher temperature due to its different melting point characteristics.
- Monitor the Soldering Iron Tip Temperature: Utilize a thermometer or an infrared temperature gun to check the temperature of the soldering iron tip. Accurate temperature monitoring can help you avoid variations that could lead to cold solder joints or burnt components.
- Adjust Settings Based on Component Sensitivity: Different components may require different temperatures; for example, soldering sensitive electronics may necessitate lower temperatures to avoid damage. Adjusting the soldering iron’s temperature according to the specific task at hand can significantly improve the quality of the solder joint.
- Practice Proper Technique: The technique used while soldering can also impact temperature maintenance. Ensuring that you have a clean tip, applying heat for the correct amount of time, and using appropriate solder can help achieve optimal thermal contact and prevent overheating.