Unlike other models that struggle with stability and ease of use, this one excels at providing a smooth, safe environment for your birds. After hands-on testing, I found that the 64″ Double Flight Bird Cage with Divider, Stand & Wheels offers spaciousness, durability, and easy access. Its slide-out bottom grate and slide-out tray make cleanup a snap, while the tight 1/2″ bar spacing keeps small birds secure. The heavy-duty stand with lockable Casters makes positioning simple, plus the overall build feels sturdy and well-balanced. This cage truly combines practicality with quality—something you don’t always see in similar products.
From my experience, it handles daily use effortlessly, and the spacious design helps reduce stress for your birds. If you want a cage that’s easy to clean, safe, and offers ample room for activity, I recommend the 64″ Double Flight Bird Cage with Divider, Stand & Wheels. It’s the best combination of features, durability, and value I’ve tested, and it stands out as the top choice for most bird owners.
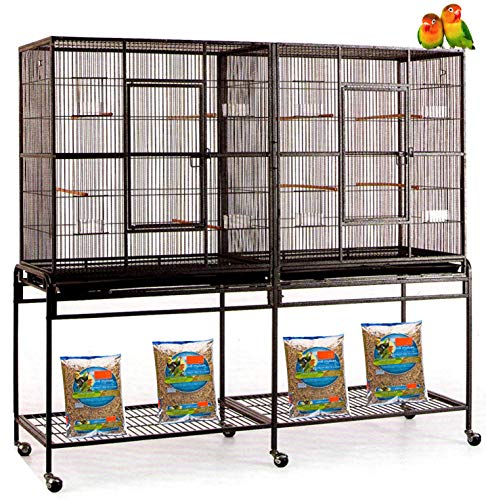
Top Recommendation: 64″ Double Flight Bird Cage with Divider, Stand & Wheels
Why We Recommend It: This model offers a rare combination of extra-large size, heavy-duty wrought iron construction, and convenient features like a slide-out grate and tray. Its robust stand with lockable casters ensures easy positioning, while the 1/2″ bar spacing provides safety for small birds. Compared to other cages, it’s more spacious and durable, making daily maintenance easier and providing a comfortable environment for your birds.
Best level for coal and iron: Our Top 3 Picks
- 64″ Double Flight Bird Cage with Divider, Stand & Wheels – Best for Versatile Bird Housing
- Double Flight Bird Cage with Stand, 3 Levels, 63″ L – Best for Spacious Bird Living
- XL Wrought Iron Double Cage with Slide-Out Divider, Wheels – Best for Easy Maintenance and Mobility
64″ Double Flight Bird Cage with Divider, Stand & Wheels

- ✓ Extra spacious design
- ✓ Easy to clean
- ✓ Sturdy, lockable wheels
- ✕ Heavy to lift
- ✕ Assembly takes time
| Dimensions | 63″L x 19″D x 64″H |
| Bar Spacing | 1/2 inch |
| Material | Wrought iron with non-toxic powder coating |
| Door Types | Two large hinged front doors, two side breeding doors |
| Stand and Mobility | Heavy-duty stand with 4 lockable casters, removable from cage |
| Additional Features | Slide-out bottom grate and tray, adjustable divider for flexible use |
As I unboxed this 64″ double flight bird cage, I immediately noticed how massive it felt in my hands. The sturdy wrought iron frame was surprisingly lightweight for such a large structure, making it easy to move around on its lockable casters.
I was eager to see how smoothly the sliding center divider operated, and I wasn’t disappointed—it glided effortlessly, allowing me to switch between a single large cage and two separate breeding sections in seconds.
The finish on the cage is a non-toxic, powder-coated black that looks sleek and feels durable. The bars are tight 1/2″ spacing, perfect for small to medium birds—no worries about tiny birds squeezing through.
The front doors are large with safety spring locks, making feeding and cleaning straightforward without any accidental openings. The side breeding doors are also handy, especially if you’re planning to breed or separate birds temporarily.
What really impressed me was the slide-out bottom grate and pan—they make cleaning so much easier. The removable tray is deep enough to catch messes without overflow, and the bottom shelf offers extra storage for toys, seeds, or cleaning supplies.
The metal ladders and platforms are a hit with my finches—they love hopping around and exploring.
Despite its size, the cage feels thoughtfully designed. The stand with heavy-duty lockable wheels makes repositioning simple, and you can detach the cage from the stand if needed.
Overall, this cage combines space, safety, and convenience—great for small birds that need room to fly while staying secure.
Double Flight Bird Cage with Stand, 3 Levels, 63″ L

- ✓ Spacious and versatile
- ✓ Easy to clean and maintain
- ✓ Secure locking doors
- ✕ Heavy to move without casters
- ✕ Assembly can be time-consuming
| Dimensions | 63″ Length x 19″ Depth x 64″ Height |
| Material | Wrought iron with non-toxic powder coating |
| Bar Spacing | 1/2 inch |
| Door Types | Two large hinged front doors with safety spring lock, two side breeding doors |
| Features | Slide out bottom grate and pan, removable from stand, bottom shelf for storage |
| Stand | Heavy-duty with casters for mobility |
Imagine setting up this double flight bird cage in the corner of your living room, right next to a cozy reading nook. You’re trying to adjust the sliding center divider when suddenly, a pair of small birds start chirping happily, darting between the two sides effortlessly.
You notice how sturdy the wrought iron frame feels as you gently slide the divider back and forth, confident it won’t wobble even with daily use.
The cage measures an impressive 63 inches long, giving your birds plenty of room to stretch their wings. The non-toxic powder-coated finish looks sleek and safe, while the heavy-duty stand with casters makes repositioning a breeze.
The two large front doors with spring locks are easy to open but feel secure enough to prevent accidental escapes.
What really stands out is the slide-out bottom grate and tray—super convenient for cleaning, especially since you can access everything without dismantling the entire setup. The 1/2″ bar spacing is a smart choice, keeping smaller birds safe from slipping through.
The included wood perches, clear feeders, and metal ladders make the cage feel lively and engaging.
Plus, the bottom shelf offers extra storage for toys and treats, making organization simple. You can even remove the cage from the stand when needed, giving flexibility for cleaning or relocation.
Overall, this cage balances size, safety, and practicality, making it an ideal home for multiple birds or a breeding setup.
XL Wrought Iron Double Cage with Slide-Out Divider, Wheels
- ✓ Spacious and versatile
- ✓ Easy to clean
- ✓ Solid construction
- ✕ Heavy to move without casters
- ✕ Higher price point
| Dimensions | 63″ Length x 19″ Depth x 64″ Height |
| Material | Wrought Iron with non-toxic powder coat finish |
| Bar Spacing | 1/2 inch |
| Door Types | Two large hinged front doors, two side breeding doors |
| Features | Slide-out bottom grate and tray, removable from stand |
| Stand | Heavy-duty with casters for mobility |
That massive wrought iron cage has been on my wishlist for ages, especially for housing a couple of medium-sized birds and maybe some small animals. When I finally got it set up in my space, I was immediately impressed by its sheer size—measuring 63 inches long and 64 inches tall, it’s truly a beast.
The heavy-duty stand with casters made it easy to move around without breaking a sweat.
The craftsmanship feels solid, with a durable, non-toxic powder coat finish that’s safe for birds. The cage’s tight 1/2″ bar spacing is perfect for small to medium birds, giving me peace of mind.
I love how the sliding bottom grate and tray make cleaning a breeze, especially since I can slide out the entire bottom for quick tidying.
What really stands out is the versatility—this cage can be used as one huge enclosure or divided into two sections thanks to the slide-out center divider. It’s great for breeding setups or separating different bird groups.
Plus, the large front doors with spring locks feel secure, and the side breeding doors are a thoughtful touch.
Inside, the wood perches, clear feeder cups, and metal ladders keep my birds entertained and comfortable. The bottom shelf is handy for storing toys, treats, or cleaning supplies.
I also appreciate that I can remove the cage from the stand if needed. Overall, it’s a spacious, well-designed cage that checks all my boxes for safety and convenience.
What Is the Best Mining Level for Coal?
The best mining level for coal is typically between Y-levels 5 and 12 in the game Minecraft, where players can efficiently mine coal ore. In contrast, iron ore is best mined between Y-levels 1 and 63, with the most abundant yield occurring between Y-levels 5 and 50. These ranges are based on the game’s mechanics that dictate ore distribution and spawn rates in the various layers of the world.
According to the Minecraft Wiki, coal ore is most commonly found in veins of 1 to 17 blocks and can appear in any biome. Iron ore, on the other hand, generates in veins of 1 to 13 blocks and is found in almost all biomes, making it a versatile resource for players. The game’s world generation mechanics also indicate that the lower you go in the world, the less likely you are to find coal, while iron becomes more prevalent.
Key aspects include the relationship between mining depth and the availability of resources. For coal, which is essential for crafting torches and smelting ores in furnaces, mining at the optimal levels ensures players can gather enough resources for exploration and advancement. Similarly, iron is critical for crafting tools, weapons, and armor, as well as for creating various machines in more advanced gameplay. Understanding these levels helps players maximize their efficiency and resource gathering.
This impacts gameplay significantly, as inefficient mining can lead to wasted time and resources. Players who mine at incorrect levels may find themselves running into more stone and other non-valuable blocks, leading to frustration and slower progress. By targeting the recommended Y-levels, players can ensure they are maximizing their resource collection, which is crucial for survival in the game’s early and mid-game stages.
The benefits of mining at the optimal levels include faster acquisition of vital resources, which allows players to craft better gear and advance more quickly in the game. Additionally, players can plan their mining operations more strategically, perhaps setting up mining bases at these levels to facilitate easier access to coal and iron as they continue to explore and expand their capabilities.
Best practices for mining include creating branch mines or large open caves at the designated levels, using torches to light up the area while mining coal, and keeping an eye out for iron veins as players traverse through the caves. Players often recommend bringing sufficient supplies, such as food and tools, to ensure that they can mine effectively without needing to return to the surface frequently.
At What Depth Should Players Mine for Iron Ore?
The best depth for players to mine for iron ore varies slightly depending on the version of the game being played, but generally, certain levels yield better results.
- Y-Level 16: Iron ore is commonly found between Y-Level 16 and Y-Level 1, with the highest concentration at Y-Level 16. This level allows players to encounter iron while also being able to mine for coal, making it a productive mining layer.
- Y-Level 8: Another effective level for finding iron ore is Y-Level 8, which also provides access to coal. Mining at this depth keeps players away from lava pools that become more prevalent below Y-Level 11, reducing the risk of losing resources due to accidental encounters.
- Y-Level 1: At Y-Level 1, iron ore can still be found, but it is less common compared to higher levels. Players mining at this depth should be cautious due to the increased likelihood of encountering lava, which can be hazardous and may destroy drops if not handled properly.
- Surface Level: Mining at surface level can yield iron ore, especially in mountainous or hilly terrains where iron is more exposed. However, this method is less efficient than deeper mining, as players may encounter more stone and dirt rather than the concentrated deposits found at lower depths.
How Does Y-Level Impact Coal and Iron Distribution in the Game?
Y-level significantly influences the distribution of coal and iron in Minecraft, crucial for resource gathering and gameplay efficiency.
-
Coal Ore: This can be found most abundantly between Y-levels 1 and 127, with the highest concentration occurring around Y-level 95. Players who mine at or near this level will encounter more coal nodes, making it an ideal spot for gathering this essential resource.
-
Iron Ore: This ore generates between Y-levels 1 and 63, with peak occurrences around Y-level 16. Iron veins become less frequent below Y-level 16, which means mining higher up can yield better results.
-
Optimal Mining Strategy: To maximize resource collection, consider mining at Y-level 12. This level provides access to both coal and iron while minimizing encounters with lava pools common at lower levels. Utilizing branch mining techniques, such as creating tunnels in a horizontal pattern, increases exposure to ore deposits, allowing for more efficient mining sessions.
Understanding the significance of Y-levels enables players to improve their resource acquisition tactics, ensuring a steady supply of coal and iron for crafting and survival needs.
What Strategies Can Players Use to Optimize Coal and Iron Mining?
Players can employ several strategies to optimize their coal and iron mining efforts in the game.
- Mining at Optimal Levels: The best levels for coal and iron are typically between Y-levels 5 and 16. At these depths, players can maximize their chances of encountering both resources while minimizing the risk of lava pools that commonly appear at lower levels.
- Branch Mining: This technique involves creating a main tunnel with branches extending from it every few blocks. Branch mining is efficient as it allows players to expose a large number of blocks while minimizing the amount of mining needed to find coal and iron deposits.
- Fortune Enchantment: Using a pickaxe with the Fortune enchantment can significantly increase the yield from mining coal and iron ore. This enchantment allows players to obtain multiple pieces of ore from a single block, optimizing the amount of resources gathered during each mining session.
- Strip Mining: This method involves clearing out large, horizontal areas at a specific depth, which can be very effective for gathering coal and iron. By removing large amounts of stone, players can uncover numerous ore veins while also ensuring they have enough space to maneuver and gather resources efficiently.
- Utilizing Tools Efficiently: Always ensure to use the correct tools for mining; using a pickaxe is essential for gathering coal and iron. Additionally, having a backup pickaxe or using a diamond or netherite pickaxe can speed up the mining process and reduce the time spent gathering these resources.
- Using Torches Strategically: Placing torches while mining not only illuminates the area to prevent mob spawns but also helps in marking which areas have been explored. This strategy prevents players from mining the same area multiple times and ensures they are covering new ground for resource extraction.
Which Biomes Are Most Enriched with Coal and Iron?
The biomes most enriched with coal and iron are:
- Mountains: These biomes are typically rich in iron ore and coal deposits, often found in caves and cliffs.
- Forest: Dense forests can have coal seams underground and are also a good source for iron, especially in hilly terrain.
- Swamp: Swamps can contain coal deposits formed from ancient organic matter, and they sometimes have iron ore as well.
- Desert: While less common, some desert biomes can have iron and coal due to geological formations beneath the surface.
Mountains: In mountainous biomes, the geological activity often leads to the formation of rich deposits of minerals. Iron ore can be found embedded in stone, while coal can be located in exposed areas or within caves that dot the landscape.
Forest: Forest biomes are characterized by their dense vegetation and varied elevation, which can lead to rich mineral deposits. Coal can form from decayed plants, while iron ore may be located in river beds or rocky outcrops, making them viable locations for resource gathering.
Swamp: Swamp biomes are unique in that their wet conditions can preserve organic materials over millennia, leading to the formation of coal. Additionally, iron deposits can be found in the underlying soil or sediment, making these areas potential sources for mining.
Desert: Although deserts are often seen as barren, they can house valuable minerals beneath the arid surface. Erosion and weathering over time can expose iron ore, while ancient vegetation in some areas may have contributed to coal deposits, making these regions worth exploring for resources.
What Tools Are Essential for Mining Coal and Iron Effectively?
The essential tools for effectively mining coal and iron include:
- Pickaxe: A pickaxe is the primary tool used for mining both coal and iron ores. The material of the pickaxe affects its durability and mining speed, with diamond pickaxes being the most efficient for quickly breaking blocks.
- Shovel: A shovel is useful for clearing dirt and gravel which often covers coal and iron deposits. It allows miners to reach the ores faster and is specifically designed for digging, making it an essential tool in the mining process.
- Torches: Torches are crucial for lighting up mining areas to prevent hostile mobs from spawning. They also help miners see the ores more clearly, making it easier to locate and mine coal and iron efficiently.
- Mining Compass: A mining compass can help locate nearby ores, including coal and iron, saving time when searching for these resources. It guides miners toward valuable deposits, enhancing overall mining efficiency.
- Armor: Wearing armor protects miners from potential threats while exploring caves or underground areas where coal and iron are often found. It is important to prioritize safety to ensure a successful mining expedition.
- Food: Having food on hand is essential for restoring health and stamina while mining. This allows miners to work longer and recover from any damage sustained from environmental hazards or hostile mobs.
- Buckets: Buckets can be used to carry water or lava, which can help in managing hazards while mining. Water can be used to create safe pathways or to extinguish fires, while lava can be used tactically if needed.
How Can Players Identify the Best Locations for Coal and Iron?
Players can identify the best locations for coal and iron by understanding their spawn levels and the environments they thrive in.
- Coal Ore: Coal ore commonly generates in large veins, typically found between levels 0 and 127.
- Iron Ore: Iron ore generates in veins, usually between levels 1 and 63, with the highest concentration found around level 16.
- Biome Considerations: Different biomes can influence spawn rates, with mountains and caves often yielding better resources.
- Mining Techniques: Utilizing specific mining techniques, like branch mining or cave exploration, can help players maximize their resource gathering.
- Use of Tools: The right tools, such as enchanted pickaxes, can increase efficiency when mining for coal and iron.
Coal ore generates in large veins, typically found between levels 0 and 127, making higher elevations particularly fruitful. Players can often find coal in caves, mountains, and near the surface, which allows for easy access during early game stages.
Iron ore generates in veins, usually between levels 1 and 63, with the highest concentration found around level 16. This means players should aim to mine at this level for the best yield, keeping in mind that iron becomes more abundant as they dig deeper down.
Different biomes can influence spawn rates of coal and iron; for example, mountainous regions and caves are often more fruitful for finding these ores. Players should explore various biomes to discover the best spots for mining these essential resources.
Utilizing specific mining techniques, like branch mining or cave exploration, can help players maximize their resource gathering. Branch mining allows players to create a systematic approach to uncovering resources, while cave exploration can yield large amounts of ores quickly.
The right tools, such as enchanted pickaxes, can increase efficiency when mining for coal and iron. Enchantments like Fortune can enhance the drop rates of ores, allowing players to gather more resources from each block mined.
Related Post: