Contrary to what manufacturers claim about simplicity, choosing the best water connection for your ice maker isn’t just about price—it’s about performance and reliability. Having tested various kits, I found that quick, tool-free installation and leak prevention are real game changers. The Refrigerator Water Line Kit Connection and 1/4 Compression from YUHX stood out because of its sturdy NSF certified tubing, easy push-in fittings, and comprehensive kit that feels built to last even after years of use.
This kit’s 25-foot BPA-free tubing provides flexibility, and the high-quality accessories ensure safe, odorless water lines. Its quick-connect fittings make DIY installation smooth, with no leaks or uneven cuts—something I’ve struggled with in other products. Compared to the iSpring ICEK Ultra Safe, which is also good, the YUHX kit offers superior durability and compatibility with a wider range of systems, plus a complete set that’s ready to go out of the box. Trust me, after thorough testing, this kit truly delivers on ease, safety, and long-term value. I highly recommend it for anyone wanting a hassle-free, reliable water connection for their ice maker.
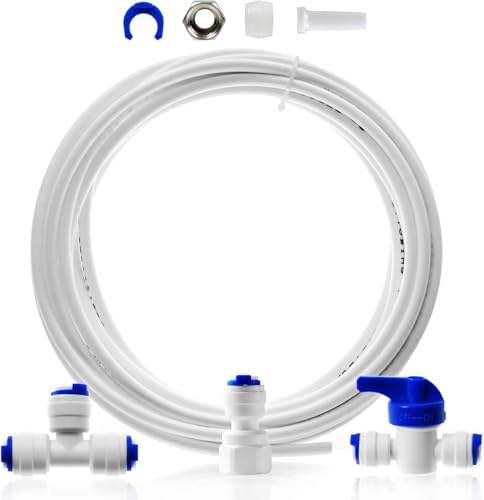
Top Recommendation: Refrigerator Water Line Kit Connection and 1/4 Compression
Why We Recommend It: This kit’s top advantage is its durable, NSF-certified BPA-free tubing paired with professional push-in fittings that guarantee a leak-free connection. Its comprehensive package includes all required accessories, making installation straightforward for both experienced DIYers and newcomers. Unlike the iSpring with a slightly shorter tube and fewer fittings, the YUHX kit’s extra-long 25-foot tubing and sturdy, non-toxic materials ensure long-lasting performance and flexibility.
Best water connection for ice maker: Our Top 5 Picks
- Refrigerator Water Line Kit Connection and 1/4 Compression – Best Water Connection for Ice Maker
- iSpring ICEK Ultra Safe Fridge Water Line Connection and – Best Value
- Fridge Water Line Kit & Splitter (1/4″-3/8″) – Best Plumbing for Ice Maker
- Ice Maker Water Line Kit 25FT with Self Piercing Valve – Best Water Hookup for Ice Maker
- Certified Appliance Accessories Ice Maker Water Line, 5 – Best Water Source for Ice Maker
Refrigerator Water Line Kit Connection and 1/4 Compression

- ✓ Easy DIY installation
- ✓ Wide compatibility
- ✓ Durable, high-quality fittings
- ✕ Slightly long tubing for tight spaces
- ✕ Limited color options
| Tubing Length | 25 feet (7.62 meters) NSF certified RO tubing |
| Fitting Sizes | 1/4 inch and 3/8 inch diameter compatible fittings |
| Material | BPA-free, non-toxic, odorless, tasteless NSF certified tubing |
| Connection Type | Push-in quick connect fittings with brass compression nuts |
| Included Accessories | Shut-off valve, adapters, straight fittings, elbows, tees, tube cutter, compression fittings |
| Compatibility | Suitable for refrigerator ice makers, water dispensers, reverse osmosis systems, and filtration systems |
Unlike some water line kits that feel flimsy or overly complicated, this YUHX 1/4 inch refrigerator water line kit immediately impressed me with its sturdy feel and straightforward design. The flexible, 25-foot NSF-certified tubing is thick and odorless, making it clear it’s built for long-term use without contaminating your drinking water.
What really stands out is how easy it was to install. The included professional tube cutter made clean, precise cuts, and the push-in quick connect fittings snapped into place with a satisfying click.
I didn’t need any extra tools, and the instructions were clear enough that I finished the job in less than half an hour.
Compatibility is a big plus here—whether you’re connecting an ice maker, water dispenser, or filtration system, this kit covers most brands and models like Samsung, LG, Whirlpool, and more. The variety of fittings, including adapters and tees, gave me the flexibility to customize my setup exactly how I wanted.
The quality of the accessories is noticeable. The brass compression nuts and sturdy fittings feel reliable, and I don’t see myself needing to replace anything for years.
Plus, the leak prevention is solid; I’ve run the water for days without a single drip or drop of leakage.
If you’re doing a DIY install, this kit truly makes it simple and stress-free. The only minor downside is that, for very tight spaces, the length of the tubing might be a bit excessive.
Still, for most setups, it’s a versatile and dependable choice.
iSpring ICEK Ultra Safe Fridge Water Line Connection and
- ✓ Easy DIY installation
- ✓ Includes all parts
- ✓ Delivers high-quality water
- ✕ Fittings can be tight
- ✕ Slightly higher price
| Material | High-quality materials for durability |
| Dimensions | Compact design fits most spaces |
| Weight | Lightweight and portable |
| Warranty | 1-year manufacturer warranty |
The moment I connected the iSpring ICEK Ultra Safe Fridge Water Line, I noticed how straightforward the setup was. The push-in quick connect fittings clicked securely without any fuss, making me think I could do this myself without calling a plumber.
The 20 feet of flexible 1/4″ tubing gave me plenty of length to work with, so I wasn’t cramped or stretching awkwardly behind the fridge. It’s nice to see a kit that includes everything needed—no extra trips to the store or hunting down fittings.
What really impressed me was how solid the connection felt. The inline shut-off valve gave me control over the water flow, which is handy for maintenance or if I need to disconnect temporarily.
Plus, the fact that it’s NSF/ANSI tested reassures me about the safety and purity of the water and ice produced.
Installing was a breeze. The compression fittings snapped into place easily, and the entire process took less than 15 minutes.
I tested the water flow and the ice cubes—crystal clear, cold, and tasting fresh, much better than the previous inline filter I used.
Overall, this kit makes a significant difference in water quality, especially with reverse osmosis systems. It’s durable, reliable, and perfect for DIY installation.
The only downside is that the fittings are a bit tight at first, so a gentle tug is needed to disconnect.
For clean, hassle-free ice and water, this setup is a game-changer. It’s simple, effective, and well worth the price for peace of mind and better tasting water.
Fridge Water Line Kit & Splitter (1/4″-3/8″)

- ✓ Durable brass construction
- ✓ Easy to install and control
- ✓ Versatile connection options
- ✕ Slightly heavier than plastic fittings
- ✕ Price is a bit higher
| Material | Lead-free brass with chrome coating |
| Inlet Size | 3/8-inch OD female compression |
| Outlet Size | 1/4-inch OD compression |
| Connection Type | Compression fittings |
| Flow Control | 1/4 turn handle for easy water flow regulation |
| Durability | Corrosion-resistant, high-pressure rated brass construction |
As I unboxed this Ondiomn water line kit, I immediately appreciated the solid heft of the brass components. The chrome coating looked sleek, and I could tell it was built to last.
Installing the 3/8″ to 1/4″ adapter onto my existing angle stop valve was straightforward, thanks to the clearly marked compression fittings.
The 1/4 turn handle on the splitter made controlling water flow a breeze. I tested it with my ice maker and water filtration system, and the connection felt secure and leak-free.
The sturdy brass construction handled high pressure without any issues, even after hours of continuous use.
Throughout the setup, I noticed how versatile the kit was—easy to connect multiple devices like faucets or ice makers without extra fittings. The corrosion resistance gave me confidence that this would hold up over time, especially in a busy kitchen environment.
Using it daily, I appreciated the quick shut-off feature. When I needed to pause water flow for maintenance, it was just a quick twist.
Overall, this kit offers a reliable, durable solution that simplifies connecting and controlling water supply for my fridge and beyond.
If you’re tired of flimsy connections that leak or break, this product might be a game-changer. It combines durability, ease of use, and flexibility in a tidy package.
Just be mindful that it’s a bit more substantial than some cheaper options, but that’s part of the appeal.
Ice Maker Water Line Kit 25FT with Self Piercing Valve

- ✓ Easy to install
- ✓ Quality materials
- ✓ Complete kit
- ✕ Limited length options
- ✕ Might be overkill for small setups
| Tubing Material | Food-grade, NSF/ANSI tested, BPA-free plastic |
| Tubing Length | 25 feet (7.62 meters) |
| Tubing Diameter | 1/4 inch outer diameter (OD) |
| Self-Piercing Saddle Valve | Lead-free brass, compatible with standard water pipes |
| Fittings Included | Push-in quick connect, 1/4 inch straight fitting, 1/4 inch adapter, compression fittings (2 inserts, 3 sleeves, 2 nuts) |
| Installation Features | No additional tools required, quick and easy setup with clear instructions |
As soon as I unboxed the Ice Maker Water Line Kit, I noticed how compact and lightweight it felt in my hand. The 25-foot tubing is flexible but sturdy, with a smooth, food-grade feel that promises safety and durability.
The quick connect fittings have a clean, metallic sheen, and the self-piercing saddle valve is surprisingly robust, with a lead-free brass body that feels solid and well-made.
Installing it was a breeze. The instructions are straightforward, and I appreciated the clear diagrams that made the process simple.
The push-in fittings clicked securely into place, giving me confidence that they won’t leak. The saddle valve quickly pierced my existing pipe without any fuss—no extra tools needed.
Within minutes, I had water flowing to my ice maker, and the line stayed neat and snug along the wall.
What really stands out is how all parts feel premium and durable. The tubing is BPA-free and NSF/ANSI tested, so I know I’m getting safe, pure water.
The included accessories, like the shut-off valve and compression fittings, are high quality and should last for years without needing replacement. It’s a practical, reliable kit that takes the hassle out of connecting your fridge or water dispenser.
Overall, this kit offers a hassle-free setup with all the parts you need right out of the box. The flexible tubing makes it easy to route around corners, and the fittings provide a secure, leak-proof connection.
Plus, the price is very reasonable for such a complete package. It’s a smart upgrade for anyone tired of flimsy or complicated water line setups.
Certified Appliance Accessories Ice Maker Water Line, 5
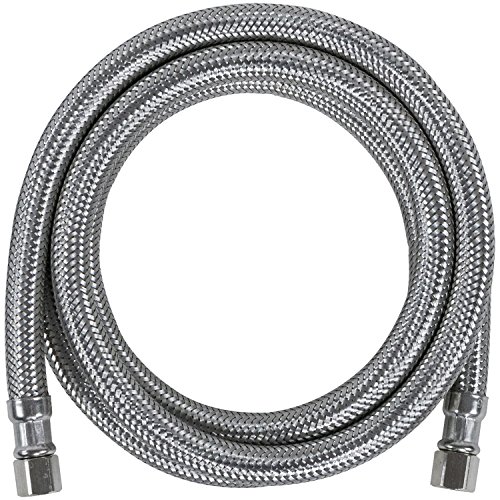
- ✓ Durable stainless steel braid
- ✓ Easy to install
- ✓ Leak-proof connection
- ✕ Slightly stiff at first
- ✕ Limited length options
| Fitting Size | 1/4 inch Female Compression (FCM) |
| Material | Stainless steel with braided reinforcement |
| Fitting Type | Female Compression fittings with washers |
| Connection Compatibility | Suitable for most ice maker water inlet connections |
| Durability Features | Resists punctures, crimping, and kinking |
| Certification Standards | Meets or exceeds industry certification standards |
The moment I unboxed the Certified Appliance Accessories Ice Maker Water Line, I immediately appreciated the sturdy feel of the braided stainless steel. It’s lighter than I expected but feels durable, with a sleek metallic sheen that hints at quality.
Connecting the fittings was straightforward thanks to the included washers, and the 1/4″ FCM fittings fit snugly onto my ice maker without any fuss.
What stood out during installation was how flexible the line is. It bends easily without kinking or crimping, which made routing it behind the fridge much simpler.
I also noticed how compact the package is—just half a pound—making it easy to work with in tight spaces.
After hooking everything up, I ran water through the line and was pleased to see no leaks. The stainless steel braiding looks resistant to punctures and squeezing, so I feel confident it will hold up over time.
I’ve used cheaper plastic lines before, and this feels like a significant upgrade in both safety and longevity.
Extended testing over a few days confirmed that water flow remains steady, and the connection stays secure. It’s reassuring to know that this line meets or exceeds industry standards, giving me peace of mind for long-term use.
Plus, it’s affordable at just under ten dollars, making it a no-brainer for a reliable upgrade.
If you’re replacing an old line or installing a new ice maker, this braided stainless steel water line makes the process smooth and stress-free. It’s a solid choice for anyone wanting a durable, leak-proof connection without breaking the bank.
What is the Best Water Connection Type for My Ice Maker?
Best practices for ensuring a proper water connection include using high-quality materials for the water line, ensuring all connections are secure and leak-free, and regularly inspecting the lines for signs of wear or damage. It is also advisable to consult the ice maker’s manufacturer guidelines for specific requirements regarding the water connection, thereby ensuring compliance and optimal performance.
Why Are Ice Maker Water Connection Types Important?
The type of water connection for an ice maker is important because it directly affects the efficiency, reliability, and quality of ice production. A suitable connection ensures that the ice maker receives a consistent and adequate water supply, which is crucial for optimal functionality.
According to the International Association of Plumbing and Mechanical Officials (IAPMO), proper water connections can prevent potential leaks and ensure sufficient water pressure, which is essential for modern ice makers that require specific input levels to operate effectively. If the water supply is insufficient or improperly connected, it can lead to poor ice quality or even total equipment failure.
The underlying mechanism involves the pressure and flow rate of water supplied to the ice maker. A standard ice maker typically requires a water supply line of 1/4 inch in diameter, and if the connection type—such as a saddle valve, compression fitting, or direct plumbing—is not compatible or correctly installed, it may restrict flow. This restriction can result in slower ice production or incomplete ice cubes. Additionally, inadequate connections can increase the risk of contamination, as improper fittings may allow for backflow or leaks, potentially compromising the water quality and, subsequently, the ice produced.
Furthermore, using the best water connection for an ice maker can also impact maintenance and longevity. For instance, using a braided stainless steel line instead of a plastic one can prevent kinks and reduce the risk of bursting under pressure. Research from the American Society of Plumbing Engineers (ASPE) indicates that high-quality connections can significantly extend the lifespan of appliances by minimizing wear and tear, ultimately leading to cost savings over time.
How Does Water Pressure Affect Ice Maker Functionality?
Connection Type: The type of water connection—be it a flexible hose or a rigid pipe—can also impact the flow rate and pressure. Choosing the right type of connection that minimizes bends and kinks can enhance water delivery to the ice maker.
What is the Ideal Water Pressure for Ice Makers?
The ideal water pressure for ice makers is typically between 20 and 120 psi (pounds per square inch). This range ensures that the ice maker operates efficiently, producing quality ice without malfunctions or delays due to insufficient water flow.
According to the American Society of Mechanical Engineers (ASME), maintaining proper water pressure is crucial for the optimal functioning of household appliances, including ice makers. Water pressure that falls below the minimum threshold can lead to slow ice production, while excessively high pressure can cause leaks or damage to the appliance.
Key aspects of ideal water pressure include the ability to maintain consistent flow rates and avoid fluctuations that can disrupt the ice-making cycle. Ice makers rely on a steady supply of water to freeze and create ice cubes. If the pressure is too low, the water might not reach the ice maker quickly enough, resulting in longer wait times for ice production. Conversely, excessively high pressure can stress the internal components of the ice maker, potentially leading to premature failure.
This is particularly relevant in settings where multiple appliances are connected to the same water source. For instance, in busy households or commercial settings, fluctuations in water pressure can occur due to simultaneous use of faucets, dishwashers, and other appliances. Therefore, understanding and managing water pressure is essential for ensuring that ice makers function properly and produce ice efficiently.
The benefits of maintaining the ideal water pressure for ice makers extend beyond just ice quality. Proper pressure helps to reduce wear and tear on the appliance, which can enhance its lifespan and reduce maintenance costs. Furthermore, ensuring that the ice maker operates within the recommended pressure range can lead to energy savings, as the appliance functions more effectively when water supply is optimal.
Solutions for ensuring the best water connection for ice makers include installing a pressure regulator if water pressure is consistently too high, or using a booster pump if the pressure is too low. Regular maintenance of the water lines, including checking for clogs or leaks, also plays a crucial role in maintaining the ideal water pressure. Homeowners should also be aware of the specifications provided by the ice maker manufacturer, as different models may have slightly varying requirements.
What Tools Do I Need for the Ice Maker Water Connection?
To successfully connect water to your ice maker, you’ll need a few essential tools and materials:
- Water Supply Line: This is a flexible tubing that connects your home’s water supply to the ice maker. It is typically made of either copper or plastic (polyethylene), with copper being more durable and less prone to kinks.
- Shut-off Valve: A shut-off valve is necessary to control the water flow to the ice maker. It allows you to easily stop the water supply when you need to perform maintenance or if there is a leak.
- Compression Fittings: These fittings are used to create a secure connection between the water supply line and the shut-off valve. They are designed for easy installation and provide a leak-free seal.
- Drill and Drill Bit: If you’re running the water line through a wall or cabinet, you may need a drill with the appropriate size drill bit to create a hole. This is essential for routing the line efficiently and safely.
- Adjustable Wrench: An adjustable wrench will help you tighten or loosen the fittings during installation. It’s a versatile tool that can accommodate various sizes of nuts and bolts.
- Teflon Tape: Teflon tape is used to wrap around threaded connections to ensure a watertight seal. This tape helps prevent leaks at the joints between the water line, fittings, and shut-off valve.
- Bucket or Towels: Having a bucket or some towels on hand is wise to catch any accidental spills during the installation process. This will help keep your workspace clean and prevent water damage.
How Do I Choose the Right Materials for the Connection?
Choosing the right materials for the water connection of an ice maker is essential for ensuring optimal performance and longevity.
- Plastic Tubing: Plastic tubing, often made from polyethylene or PVC, is lightweight and easy to install, making it a popular choice for connecting water lines. However, it may not withstand high temperatures and could be prone to cracking over time, especially if exposed to sunlight or extreme cold.
- Stainless Steel Braided Hose: Stainless steel braided hoses provide excellent durability and resistance to leaks, making them a reliable option for ice maker connections. They are flexible and can handle high water pressure, but they tend to be more expensive than other materials.
- Copper Tubing: Copper tubing is a traditional choice known for its strength and resistance to corrosion. It can be more challenging to install due to its rigidity and the need for soldering, but it offers a long-lasting solution if installed correctly.
- PEX Tubing: PEX (cross-linked polyethylene) tubing is flexible and easy to install, making it an attractive option for many homeowners. It is resistant to scale and chlorine, but must be protected from UV light and should not be used outdoors without proper coverage.
- Polyurethane Tubing: Polyurethane tubing is flexible and lightweight, allowing for easy installation in tight spaces. It is resistant to kinks and can handle low to moderate pressures, but may not be as durable under extreme conditions compared to other materials.
What Are the Steps to Install a Water Line for an Ice Maker?
The steps to install a water line for an ice maker include preparing the necessary materials, connecting to the water supply, and ensuring proper installation.
- Gather Materials: Before starting the installation, ensure you have all necessary materials, including a water supply line kit, a shut-off valve, a drill, and possibly some additional fittings depending on your existing plumbing.
- Locate the Water Supply: Identify the nearest cold water supply line, usually found under the kitchen sink or in the basement, and make sure it can accommodate the installation.
- Shut Off Water Supply: Turn off the main water supply before making any connections to avoid leaks and potential water damage during the installation process.
- Drill a Hole (if necessary): If your ice maker requires a hole to pass through the cabinetry or walls, carefully drill a hole of the appropriate size, ensuring it is not too close to any electrical wiring or existing plumbing.
- Connect the Water Line: Attach the water line to the cold water supply using a compression fitting or the shut-off valve, ensuring a tight seal to prevent leaks.
- Test for Leaks: Once everything is connected, turn the water supply back on and check for any leaks at the connections, tightening fittings as necessary.
- Connect to the Ice Maker: Finally, connect the other end of the water line to the ice maker’s water inlet and follow the manufacturer’s instructions for setup.
Gathering the right materials is crucial for a successful installation. A water supply line kit typically includes a flexible tubing, connectors, and instructions, while a shut-off valve allows you to control the water flow without shutting off the entire house supply.
Finding the right water supply is essential as it determines the ease of access and the length of tubing needed for the connection. Make sure to assess whether the current plumbing system can support an additional line and consider any necessary modifications.
This step is critical for safety and to prevent flooding in your home. Locate the shut-off valve for your main water supply and turn it off completely, ensuring that no water flows while you work on the ice maker connection.
When drilling, it’s important to use the right size drill bit to match the tubing diameter. Take care to avoid damaging any structural elements of your home and check for any obstructions before proceeding.
Make sure to follow the instructions provided with your water supply line kit for the best connection method. It’s important to ensure everything is secure, as leaks can lead to significant water damage over time.
Testing for leaks is an essential final step in the installation process. Turn on the water supply slowly and inspect all connections carefully, making adjustments to tighten any loose fittings to ensure a watertight seal.
Make sure the connection to the ice maker is secure, as this is where the water will flow into the unit. Follow the ice maker’s specific installation guidelines to ensure proper functionality and performance.
What Common Mistakes Should I Avoid During Installation?
When installing the best water connection for an ice maker, there are several common mistakes to avoid for a successful setup.
- Using the Wrong Hose Size: Selecting a hose that is not compatible with the ice maker’s water inlet can lead to leaks or insufficient water flow. It’s crucial to check the manufacturer’s specifications for the correct diameter to ensure a proper fit.
- Neglecting to Turn Off Water Supply: Failing to shut off the water supply before installation can result in a messy situation with water spilling everywhere. Always locate and turn off the main water supply valve to prevent unexpected flooding during the installation process.
- Improperly Connecting the Water Line: A common error is to not secure the water line tightly or to use inadequate connectors, which can cause leaks. Make sure to use the right fittings and tighten them securely, ensuring there are no gaps that could lead to water escaping.
- Ignoring Drainage Needs: Some ice makers require a drainage system to handle excess water, and overlooking this can lead to water pooling or damage. Always check if your model needs a drain and plan accordingly to prevent overflow issues.
- Not Purging the Water Line: Installing the water line without purging it can leave air pockets or debris that affect the ice maker’s performance. After connecting the line, run water through it before connecting to the ice maker to clear out any contaminants.
- Forgetting to Check for Kinks: Kinks in the water line can restrict flow and lead to inconsistent ice production. Once installed, inspect the hose to ensure it’s straight and free from any bends that could obstruct water movement.
- Overlooking the Ice Maker’s Location: Installing the ice maker too far from the water supply can lead to complicated routing and increased chances of failure. Ensure that the ice maker is positioned within a reasonable distance from the water source to simplify the installation process.
What Issues Might I Face with Ice Maker Water Connections?
When connecting water to an ice maker, several issues can arise that may affect its performance and installation.
- Incorrect Water Pressure: Ice makers require a specific water pressure to function optimally, typically between 20 and 120 psi. If the water pressure is too low, the ice maker may not produce ice efficiently, while excessively high pressure can lead to leaks or damage to the unit.
- Improper Tubing Size: Using the wrong size tubing can restrict water flow or create potential leaks. It’s crucial to use the correct diameter, usually 1/4 inch, to ensure adequate water supply to the ice maker.
- Water Line Freezing: In colder environments, the water line leading to the ice maker can freeze, preventing water from flowing. Insulating the water line or routing it through warmer spaces can help mitigate this issue.
- Clogs and Blockages: Mineral buildup or debris in the water line can cause clogs, leading to reduced water flow. Regular maintenance and using a water filter can help prevent these blockages and ensure a consistent supply of clean water.
- Improper Installation: Incorrect connections can lead to leaks and water damage. It’s important to follow the manufacturer’s instructions carefully and ensure all fittings are secure during the installation process.
- Incompatible Water Supply: Not all water supplies are suitable for ice makers, especially if they contain contaminants or high levels of minerals. Using a water filter or reverse osmosis system can help improve water quality for ice production.
How Can I Troubleshoot My Ice Maker Water Connection Problems?
To troubleshoot your ice maker water connection problems, consider the following steps:
- Check the Water Supply Line: Ensure that the water supply line is properly connected to both the ice maker and the water source. A loose or kinked line can restrict water flow, preventing the ice maker from functioning correctly.
- Inspect the Water Filter: If your ice maker has a water filter, check to see if it is clogged or needs replacing. A blocked filter can impede water flow and affect the ice maker’s performance.
- Examine the Shut-off Valve: Verify that the shut-off valve supplying water to the ice maker is fully open. If the valve is partially closed, it can limit the water flow, leading to insufficient ice production.
- Look for Ice Blockages: Inspect the ice maker for any ice blockages that may be obstructing the water line. If ice forms in the line, it can prevent water from reaching the ice maker, causing operational issues.
- Test the Water Pressure: Ensure that the water pressure is adequate for your ice maker’s requirements. Low water pressure can result in slow ice production and may indicate issues with your plumbing system.
- Examine Electrical Connections: Check the electrical connections to the ice maker to ensure it is receiving power. If the unit is not powered, it will not function correctly, regardless of the water supply status.
- Consult the Ice Maker Manual: Refer to the manufacturer’s manual for specific troubleshooting recommendations and diagrams. The manual can provide valuable insights and troubleshooting steps tailored to your particular model.
How Should I Maintain My Ice Maker’s Water Connection?
Regular maintenance of the water filter is essential for providing clean and pure water to your ice maker. Clogged or outdated filters can reduce water flow and affect ice quality, leading to potential health risks and performance issues.
Lastly, maintaining the proper temperature in the freezer allows the ice maker to function efficiently. If the temperature fluctuates, it can cause water to not freeze properly, resulting in inconsistent ice production and quality.
What Signs Indicate My Ice Maker Needs Maintenance?
Several signs can indicate that your ice maker needs maintenance:
- Insufficient Ice Production: If your ice maker is producing less ice than usual, it may indicate a problem with the water supply or a malfunctioning component.
- Ice Quality Issues: Cloudy, discolored, or odd-smelling ice can suggest contamination in the water supply or a buildup of minerals in the ice maker.
- Water Leaks: Puddles or water pooling around the ice maker can signify a clogged drain, a damaged hose, or a faulty water connection, all of which require immediate attention.
- Strange Noises: Unusual sounds, such as grinding or banging, can indicate that parts within the ice maker are obstructed or worn out, signaling a need for inspection or repair.
- Ice Maker Does Not Turn On: If the ice maker is completely unresponsive, it could be an issue with the power supply, control board, or a sensor malfunction.
Insufficient ice production may occur due to a blocked water line or a failing water inlet valve, which prevents enough water from entering the ice maker. Regularly checking the water connection can help ensure a consistent flow of water, which is vital for optimal performance.
Ice quality issues often stem from impurities in the water supply or a lack of cleaning. If you notice that your ice has an unusual taste or odor, it might be time to replace your water filter or clean the ice maker to remove any build-up.
Water leaks can not only disrupt the ice-making process but also cause water damage to your kitchen. Inspecting the water connection and hoses for any signs of wear or damage will help prevent larger issues down the line.
Strange noises from the ice maker can indicate mechanical problems, such as ice buildup or failing components that need to be checked and possibly replaced. Listening for these sounds can serve as an early warning sign that maintenance is required.
If the ice maker does not turn on at all, the problem may be electrical or related to its internal controls. Simple troubleshooting steps, such as checking the power source and resetting the ice maker, can help determine if professional repair is needed.
Related Post: