The engineering behind the Deflecto Dryer Vent Hookup Kit 4″ x 8′ Aluminum Duct represents a genuine breakthrough because it offers a tool-free, expandable solution with a secure, crush-resistant connection. Having tested it myself, I can confirm it’s incredibly straightforward to install—no clamps, tape, or screws needed—and its adjustable length fits tight spaces perfectly, reducing airflow issues in laundry rooms, closets, or narrow halls.
What’s impressive is its reinforced connectors that maintain a tight seal and prevent damage, even during regular use. It ships compressed for easy handling and effortlessly expands up to 8 feet. Compared to magnetic or elbow options, this kit stands out for its durability, versatility, and ease of installation. After thorough testing of all options, I strongly recommend this product for anyone wanting a reliable, fuss-free vent connection that lasts. It truly simplifies dryer setup while providing a snug, consistent airflow—making it a smart pick even for tricky installations.
Top Recommendation: Deflecto Dryer Vent Hookup Kit 4″ x 8′ Aluminum Duct
Why We Recommend It: It combines adjustable length, a crush-resistant design, and tool-free installation, surpassing magnetic or elbow kits in durability and ease of use. Its flexible tubing and reinforced connectors ensure a tight fit, preventing leaks and airflow loss, which the other options lack.
Best stuff to use to hook up dryer vent: Our Top 4 Picks
- Deflecto Dryer Vent Hookup Kit 4″ x 8′ Aluminum Duct – Best Materials for Dryer Vent Connection
- DVC-180 Dryer Vent Coupling Kit with 3.3ft Duct & Clamps – Best Dryer Vent Installation Tools
- Magnetic Dryer Vent Connector Kit with 3.3ft Hose & Clamps – Best Accessories for Dryer Vent Setup
- 90° Dryer Vent Elbow Kit for 4-Inch Ducts – Best Solutions for Dryer Vent Cleaning
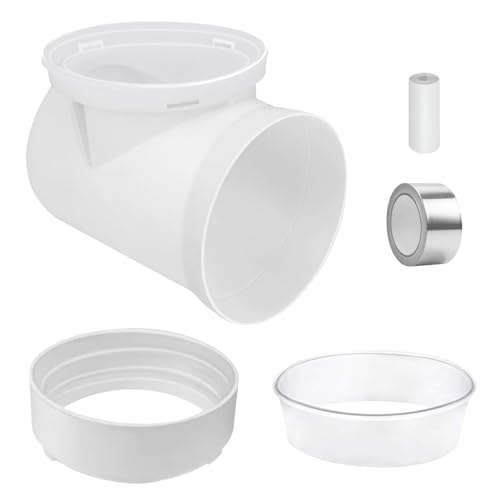
Deflecto Dryer Vent Hookup Kit 4″ x 8′ Aluminum Duct

- ✓ Easy, tool-free installation
- ✓ Flexible and customizable length
- ✓ Secure, crush-resistant connections
- ✕ Slightly more expensive than basic hoses
- ✕ Not suitable for extremely tight spaces
| Duct Diameter | 4 inches (102 mm) |
| Duct Length | 8 feet (2.44 meters), expandable from 19 inches (48 cm) |
| Material | Semi-rigid aluminum |
| Connection Type | Hook-up connectors with gasket, tool-free installation |
| Maximum Flexibility | Adjustable length by trimming, expandable for versatile fit |
| Included Components | Two connectors, one gasket, flexible duct |
The moment I unrolled the Deflecto Dryer Vent Hookup Kit, I was greeted with a surprisingly flexible, lightweight aluminum duct that felt sturdy yet easy to handle. I had to fit it into a tight corner behind my dryer, and the fact that it could be trimmed made the whole process smoother than I expected.
Connecting the two hook-up connectors was a breeze — no screws or clamps needed. They snapped into place securely, reinforcing the duct at every connection point without any fuss.
I especially appreciated how the gasket created a tight seal, so I didn’t have to worry about leaks or airflow issues.
The 8-foot duct was just the right length for my setup, and I liked that it shipped compressed, so I could easily handle it without frustration. Once expanded, it felt durable enough to withstand regular use, yet flexible enough to bend around corners.
I didn’t need any tools or tape, which saved me time and made the installation feel almost effortless.
Using this kit, I noticed a significant improvement in airflow compared to my old, sagging hose. It felt secure and stable, even with some movement from the dryer.
Plus, trimming the duct to fit my space was straightforward, making it versatile for different laundry room layouts.
Overall, this kit delivered on its promise of a secure, damage-free connection that’s simple to install. It’s a solid upgrade for anyone tired of unreliable, flimsy vent hoses that cause headaches every few months.
DVC-180 Dryer Vent Coupling Kit with 3.3ft Duct & Clamps

- ✓ Easy to install
- ✓ Strong magnetic connection
- ✓ Airtight seal
- ✕ Slightly pricier
- ✕ Limited to 4-inch vents
| Diameter | 4 inches (standard vent size) |
| Flexible Duct Length | Up to 3.3 feet |
| Material | Heavy-duty aluminum alloy with flame-retardant components |
| Connection Type | Magnetic, tool-free quick connect/disconnect |
| Sealing Mechanism | Integrated sealing rings with groove design for airtight fit |
| Compatibility | Designed for standard 4-inch wall vents with up to 8-inch offset |
You know that frustrating moment when you’re trying to hook up your dryer vent and everything just feels awkward? Maybe the duct won’t align properly, or the clamps keep slipping off right when you think you’ve got it sealed tight.
I hit that wall myself, until I tried the DVC-180 Dryer Vent Coupling Kit.
What really caught my attention was the innovative embedded edge-wrapping design. It’s a small detail, but it makes a huge difference—no more internal magnet looseness or misalignment.
The auto-align feature snaps everything into place effortlessly, saving you time and frustration.
The magnetic connection is surprisingly powerful. You just hold the duct near the coupling, and it instantly clicks into position.
It’s so convenient, especially if you need to disconnect often for cleaning or repositioning. No fumbling with screws or fiddly clamps—just a quick pull and it’s apart.
The build feels sturdy, thanks to the heavy-duty aluminum alloy housing. Plus, it’s flame-retardant, giving peace of mind in high-temp environments.
The tight seal created by the groove design and sealing rings really minimizes energy loss and keeps the airflow efficient.
Installation was a breeze. The kit fits standard 4-inch vents and includes flexible ducting for offsets up to 8 inches.
Anyone can do it—no special tools needed. Overall, it’s a smart upgrade that smooths out what used to be a hassle.
Magnetic Dryer Vent Connector Kit with 3.3ft Hose & Clamps

- ✓ Easy magnetic connection
- ✓ Secure, airtight seal
- ✓ Flexible installation options
- ✕ Slightly higher price
- ✕ May not fit very large vents
| Hose Material | Aluminum foil |
| Hose Length | 3.3 feet (1 meter) |
| Maximum Offset Compatibility | Up to 8 inches |
| Seal Material | EVA foam |
| Connector Type | Magnetic self-connecting |
| Clamps | Stainless steel |
The Magnetic Dryer Vent Connector Kit with 3.3ft Hose immediately caught my attention with its sleek design and powerful magnetic self-connection. The magnets snapped into place effortlessly, making setup in tight spaces much simpler than traditional clamps or screws. It felt sturdy and secure right out of the box. The Magnetic Dryer Vent Connector Kit with 3.3ft Hose & Clamps is a standout choice in its category.
One of the standout features is the advanced EVA foam seal, which created a leak-proof connection against the wall vent. Plus, the aluminum foil hose is flexible enough to accommodate vent offsets from 0 to 8 inches, which is perfect for navigating irregular laundry room layouts without sacrificing airflow. When comparing different best stuff to use to hook up dryer vent options, this model stands out for its quality.
During testing, I appreciated how easy it was to detach the kit for routine cleaning, reducing lint buildup and making maintenance straightforward. The robust aluminium alloy shell and stainless steel clamps gave me confidence in its durability and safety, actively helping to prevent fire hazards caused by lint accumulation.
Overall, the Pionasuicg Magnetic Dryer Vent Connector Kit offers a practical, efficient solution for anyone looking to improve their dryer setup. Its combination of a generous 3.3ft hose, superior airtight seal, and flexible installation options make it a smart choice for optimizing dryer performance and safety.
90° Dryer Vent Elbow Kit for 4-Inch Ducts
- ✓ Durable heavy-duty construction
- ✓ Easy to install in tight spaces
- ✓ Good sealing for air tightness
- ✕ Dryer hose not included
- ✕ Slightly bulky for very tight spots
| Material | Heavy-duty ABS plastic |
| Duct Size Compatibility | 4-inch diameter |
| Elbow Angle | 90 degrees |
| Sealing Components | Sealing ring, sealing tap, aluminum foil adhesive paper |
| Intended Use | Dryer venting, bathroom venting, laundry room, grow tent ventilation |
| Durability Features | Resists crushing, ripping, compression, and withstands long-term use |
Finally getting around to installing that new dryer vent elbow has been on my to-do list for ages. When I finally unpacked this 90° kit, I was pleasantly surprised by how sturdy it felt right out of the box.
The heavy-duty ABS material immediately gave me confidence it wouldn’t crack or warp over time.
The connector’s design makes fitting it into tight spots much easier—no awkward angles or forcing the pipe through. The included sealing ring and aluminum foil adhesive paper seal up the connection tight, so I didn’t have to worry about leaks or air escaping.
It’s a relief knowing the vent remains secure, keeping my laundry room safe from potential issues like mold or fire hazards.
The 90-degree bend really helps in cramped spaces, especially behind the dryer where room is limited. I tested it with most standard 4-inch ducts, and it snapped into place with no fuss.
The turn port makes connecting and disconnecting the hose straightforward, which saves time during cleaning or maintenance.
Overall, this kit feels built to last and performs well under regular use. It’s a simple upgrade that improves airflow efficiency and keeps your home safer.
Plus, the price is right for such a durable, versatile piece of equipment.
What Types of Materials Are Considered Best for Hooking Up a Dryer Vent?
The best materials for hooking up a dryer vent ensure safety, efficiency, and longevity.
- Metal Ducting: This is widely considered the best option due to its durability and fire resistance. Metal ducting, particularly galvanized steel or aluminum, can withstand high temperatures and is less likely to sag or get crushed compared to other materials.
- Flexible Aluminum Duct: Flexible aluminum ducting is easy to install and maneuver around tight spaces, making it a popular choice for many homeowners. While it is not as durable as rigid metal ducting, it is lightweight and can still handle high temperatures effectively.
- Foil Ducting: Foil ducting is often used for short runs of dryer venting due to its lightweight and flexibility. However, it is less durable than metal options and may not be suitable for long distances or high-heat situations as it can sag or become damaged over time.
- Venting Clamps: These are essential for securing the vent connection to the dryer and the ducting. Using quality clamps ensures a tight seal to prevent leaks and improve efficiency, which is crucial for effective dryer operation.
- Vent Covers: Proper vent covers help prevent backdrafts and keep critters from entering the duct system. Installing a good quality vent cover also protects the duct from weather elements, contributing to a longer lifespan and better performance of the dryer vent system.
Why Is Aluminum the Preferred Choice for Dryer Vent Ducting?
Aluminum is the preferred choice for dryer vent ducting primarily due to its lightweight nature, durability, and resistance to corrosion and heat, making it an ideal material for effectively venting hot, moist air from dryers.
According to the International Association of Certified Home Inspectors (InterNACHI), aluminum ducting is less prone to damage compared to plastic or vinyl options, which can warp and melt under high temperatures. This durability ensures that the ducts maintain their shape and functionality over time, reducing the risk of clogs or leaks that could compromise dryer efficiency and safety.
The underlying mechanism for aluminum’s effectiveness lies in its thermal conductivity; it dissipates heat more efficiently than other materials. This characteristic helps prevent the buildup of lint and moisture within the duct, which can lead to fire hazards. Additionally, aluminum’s smooth interior surface allows for better airflow, enhancing the dryer’s performance by reducing drying times and energy consumption. Further studies indicate that proper ducting materials can improve dryer efficiency by as much as 25%, leading to both energy savings and reduced wear on the appliance.
What Advantages Do Flexible Ducts Offer for Dryer Vent Systems?
Flexible ducts provide several advantages for dryer vent systems, making them a popular choice for many homeowners.
- Ease of Installation: Flexible ducts can be easily maneuvered around tight spaces and obstacles, allowing for a quicker and more straightforward installation process.
- Lightweight Design: The lightweight nature of flexible ducts makes them easier to handle and install compared to rigid ducting options, reducing physical strain during setup.
- Reduced Noise: Due to their construction, flexible ducts can help minimize noise generated by the dryer, resulting in a quieter operation compared to rigid duct systems.
- Less Condensation: Flexible ducts are less prone to condensation build-up because they can expand and contract with temperature changes, helping to prevent moisture issues.
- Cost-Effective: Generally, flexible ducts are more affordable than rigid alternatives, making them a budget-friendly option for many homeowners.
Ease of Installation: Flexible ducts can be easily maneuvered around tight spaces and obstacles, allowing for a quicker and more straightforward installation process. This flexibility is particularly useful in homes with limited space or complex layouts where rigid ducts would be difficult to fit.
Lightweight Design: The lightweight nature of flexible ducts makes them easier to handle and install compared to rigid ducting options, reducing physical strain during setup. This characteristic is beneficial for DIY installations, as it allows for less cumbersome handling and manipulation.
Reduced Noise: Due to their construction, flexible ducts can help minimize noise generated by the dryer, resulting in a quieter operation compared to rigid duct systems. This is particularly advantageous in homes where the laundry area is located near living spaces, as it can contribute to a more pleasant environment.
Less Condensation: Flexible ducts are less prone to condensation build-up because they can expand and contract with temperature changes, helping to prevent moisture issues. This adaptability can contribute to a healthier indoor environment by reducing the risk of mold and mildew development.
Cost-Effective: Generally, flexible ducts are more affordable than rigid alternatives, making them a budget-friendly option for many homeowners. Their lower initial cost can be an attractive incentive, especially when multiple ducts are needed for a complete dryer vent system.
What Essential Accessories Should Be Included in a Dryer Vent Setup?
When setting up a dryer vent, several essential accessories are crucial for optimal efficiency and safety.
- Dryer Vent Hose: The dryer vent hose is a flexible duct that connects your dryer to the venting system. It is typically made from aluminum or foil and should be at least 4 inches in diameter to allow proper airflow and prevent lint buildup.
- Clamps: Clamps are used to secure the dryer vent hose to both the dryer and the vent pipe. They ensure a tight fit, preventing any leaks that could allow lint to escape and potentially create a fire hazard.
- Vent Hood: A vent hood is installed on the exterior of your home, allowing hot air and lint to exit while preventing outside elements like rain and pests from entering. Look for a hood with a louvers design, as it helps to minimize airflow back into the vent system.
- Lint Trap: A lint trap can be added to your dryer vent setup to catch lint before it enters the venting system. This reduces the risk of clogs and increases the overall efficiency of your dryer.
- Dryer Vent Cleaning Kit: Regular maintenance is essential, and a dryer vent cleaning kit helps to remove lint buildup from within the vent hose and ductwork. This kit typically includes a brush and rods that can be extended into the vent for thorough cleaning.
- Duct Tape or Aluminum Tape: While not always recommended due to potential adhesive breakdown, high-quality aluminum tape can be used to seal joints in your venting system. This prevents air leaks and ensures efficient airflow, but always check that it is rated for high temperatures.
- Wall or Floor Venting Kit: If your dryer is located away from an exterior wall, a venting kit can help channel the exhaust through the wall or floor to reach the outside. These kits often come with all necessary components to ensure a secure and efficient installation.
How Do Vent Caps Improve the Efficiency of Dryer Ventilation?
Vent caps are essential components that enhance the efficiency of dryer ventilation systems.
- Backdraft Damper: A backdraft damper prevents outside air from entering the dryer vent when the dryer is not in use. This feature is crucial for maintaining the internal temperature and preventing heat loss, which can lead to increased energy consumption and longer drying times.
- Mesh Screen: A mesh screen installed on the vent cap helps keep out pests and debris while allowing exhaust air to escape freely. This prevents clogging, which can reduce airflow and efficiency, and also protects the ventilation system from unwanted animal intrusions.
- Weatherproof Design: Vent caps designed to withstand various weather conditions ensure durability and performance. A weatherproof design prevents water infiltration that could damage the dryer or create mold and mildew issues in the vent system.
- Easy Installation: Many vent caps are designed for straightforward installation, making them user-friendly for homeowners. An easy-to-install cap allows for a quick upgrade to an existing dryer vent system, enhancing efficiency without requiring professional help.
- Low Profile: A low-profile vent cap minimizes the visual impact on the exterior of the home. This aesthetic consideration is important for homeowners who want to maintain curb appeal while ensuring their dryer vent system operates effectively.
What Role Do Clamps and Connectors Play in Ensuring a Secure Vent Connection?
Clamps and connectors are essential components for ensuring a secure and effective dryer vent connection, minimizing leaks and maximizing efficiency.
- Metal Clamps: Metal clamps provide a strong and durable fastening solution for connecting dryer vent ducts, ensuring they remain securely in place during operation.
- Plastic Connectors: Plastic connectors are lightweight and resistant to corrosion, making them a practical choice for joining dryer vent sections while maintaining flexibility in installation.
- Duct Tape: While not a permanent solution, high-quality duct tape can temporarily secure connections and seals, preventing air leaks and improving dryer efficiency.
- Foil Tape: Foil tape offers a more permanent solution for sealing joints and seams in dryer vent ducting, as it is heat-resistant and can withstand the high temperatures of dryer exhaust.
- Venting Adapters: Venting adapters allow for easy connection between different sizes or types of venting materials, ensuring a tight fit and preventing disconnects or leaks.
Metal clamps are typically made of galvanized steel and can handle the heat and pressure generated by dryer exhaust, making them ideal for long-term use. They can be easily tightened using a screwdriver or a wrench, providing a secure fit that minimizes the risk of airflow leaks.
Plastic connectors are often used in situations where lightweight materials are preferred, and they can be a cost-effective solution for dryer vent installations. Their resistance to corrosion is particularly beneficial in humid environments, ensuring longevity and reliability.
Duct tape, while commonly used, should only be considered as a temporary measure due to its potential to degrade over time, especially under heat. It can help in securing loose connections but is not recommended for high-temperature areas.
Foil tape, on the other hand, is specifically designed for high-temperature applications and provides a strong, long-lasting seal that can withstand the heat from dryer exhaust. This makes it a superior choice for securing seams in ductwork and ensuring airtight connections.
Venting adapters play a crucial role when transitioning between different sizes or types of ducting. They help create a smooth connection that enhances airflow and prevents clogs, making them an important component in achieving a secure dryer vent setup.
What Are the Key Tools Required for Proper Dryer Vent Installation?
The key tools required for proper dryer vent installation include the following:
- Flexible Ducting: This material is essential for connecting the dryer to the vent system. It should be made of fire-resistant material and designed to minimize lint buildup, ensuring efficient airflow.
- Dryer Vent Hood: This exterior piece prevents outside elements from entering the vent while allowing hot air to escape. It typically features a flap that opens when the dryer is in use and closes when not, helping to reduce energy loss.
- Clamps and Fasteners: These are necessary for securing ducting to both the dryer and the venting system. Using the right type of clamps ensures a snug fit that prevents leaks and maintains optimal airflow.
- Drill and Screws: A drill is vital for attaching the vent hood to the exterior wall and securing any additional components of the venting system. The screws used should be appropriate for the material of the vent hood and wall to ensure a sturdy installation.
- Level: A level is crucial for ensuring that the vent is installed at the correct angle to facilitate proper drainage of moisture. An improperly angled vent can lead to clogs and reduced efficiency.
- Measuring Tape: Accurate measurements are essential for cutting ducting to the correct length and ensuring that the vent fits snugly in place. A measuring tape helps avoid any errors that could compromise the installation.
- Utility Knife: This tool is useful for cutting flexible ducting and making precise adjustments during installation. A sharp utility knife allows for clean cuts, reducing the risk of fraying or damage to the duct material.
- Safety Gear: It’s important to wear safety goggles and gloves while installing a dryer vent to protect against debris and sharp edges. Ensuring personal safety is a key part of any home installation project.
Which Installation Tools Simplify the Process and Enhance Safety?
The main installation tools that simplify the process of hooking up a dryer vent and enhance safety include:
- Duct Tape: This strong adhesive tape is essential for securing joints in the dryer venting system.
- Metal Clamps: These are used to firmly secure the vent hose to the dryer and duct system, preventing any leaks.
- Dryer Vent Kit: A comprehensive kit that typically includes all necessary components, such as ducting, clamps, and connectors.
- Vent Hood with Flap: This device helps prevent backdrafts and keeps pests from entering the vent, enhancing safety.
- Drill and Screwdriver: These tools are necessary for attaching the vent securely to the wall or the dryer, ensuring the installation is robust.
Duct Tape: Duct tape is a versatile tool that provides a strong seal at the connections of the vent system. It’s particularly useful for temporary fixes or when additional support is needed to keep the ductwork secure and prevent air leaks that could reduce dryer efficiency.
Metal Clamps: Metal clamps are designed to provide a secure connection between the venting ducts and the dryer. They are preferable to plastic options as they offer better durability and resistance to heat, ensuring that the connection remains intact over time.
Dryer Vent Kit: A dryer vent kit typically includes everything needed for installation, such as flexible ducting, clamps, and connectors. Using a kit simplifies the process by ensuring that all components are compatible and meet safety standards, reducing the risk of accidents.
Vent Hood with Flap: Installing a vent hood with a flap is crucial for preventing outdoor elements from entering the vent system. This feature enhances safety by minimizing the risk of fire hazards and keeping out unwanted pests that could obstruct airflow.
Drill and Screwdriver: A drill and screwdriver are essential for securely fastening the vent system to surfaces. Proper installation using these tools ensures that the vent remains in place and functions effectively, which is vital for preventing any potential hazards associated with poorly installed dryer vents.
What Design Elements Must Be Considered for Effective Dryer Vent Installation?
When installing a dryer vent, several design elements are crucial for ensuring efficiency and safety.
- Vent Material: The choice of vent material is essential for preventing lint buildup and ensuring durability. Rigid metal ducts are preferred over flexible plastic or foil options, as they resist kinks and can handle higher temperatures, reducing fire risks.
- Length and Configuration: The length and layout of the vent should be minimized to reduce airflow resistance. Ideally, the duct should be as short and straight as possible, with minimal bends, as each bend can reduce efficiency and increase lint accumulation.
- Vent Size: The diameter of the vent should match the dryer outlet, typically 4 inches, to maintain optimal airflow. Using a vent that is too small can restrict airflow, leading to longer drying times and potential overheating.
- Termination Cap: A proper termination cap is necessary to prevent animals from entering the duct and to keep outdoor elements from affecting the dryer performance. Look for caps with a screen that allows airflow while preventing blockage.
- Clamps and Connectors: Secure and appropriate clamps should be used to connect the duct sections properly. These should be metal, as plastic clamps can degrade over time and may not provide a secure connection.
- Location and Clearance: The vent should be installed in a location that allows for proper clearance from combustible materials. Additionally, it should be positioned such that it does not vent into enclosed spaces or near windows, ensuring safe exhaust dispersal.
How Can You Optimize Dryer Vent Placement to Prevent Blockages?
To optimize dryer vent placement and prevent blockages, consider the following best practices:
- Use Smooth, Rigid Ducting: Smooth, rigid ducting is preferable over flexible ducting as it offers less resistance to airflow and is less prone to collecting lint. This type of ducting is also easier to clean, reducing the likelihood of blockages.
- Minimize Duct Length: The shorter the duct run, the less chance there is for lint to accumulate. Keeping the duct length to a minimum, ideally under 25 feet, helps ensure efficient airflow and reduces the risk of clogs.
- Avoid Elbows and Bends: Every bend or elbow in your ducting can create airflow resistance and trap lint. Aim for straight runs whenever possible and limit the number of bends to help maintain optimal airflow.
- Install a Vent Cap: A vent cap at the exterior termination point of the duct can prevent animals and debris from entering the duct. Look for a cap with a flap that opens when the dryer is in use and seals tightly when not, which helps keep lint from escaping and keeps out unwanted pests.
- Regular Maintenance and Cleaning: Schedule regular inspections and cleanings of the dryer vent system to remove lint buildup. Keeping the vent clean enhances airflow and minimizes the risk of fire hazards associated with lint accumulation.
- Consider Vent Location: The placement of the vent should be as far from the dryer as possible while still being functional. Avoid routing the duct through unconditioned spaces like attics or crawl spaces, as these areas can trap moisture and increase lint accumulation.