Ever struggle to quickly zero your iron sights when precision matters? I’ve been there—fiddling with sights that are clunky or don’t hold zero under tough conditions. After hands-on testing, I found that a low-profile, durable iron sight really makes a difference, especially in high-stress shooting scenarios.
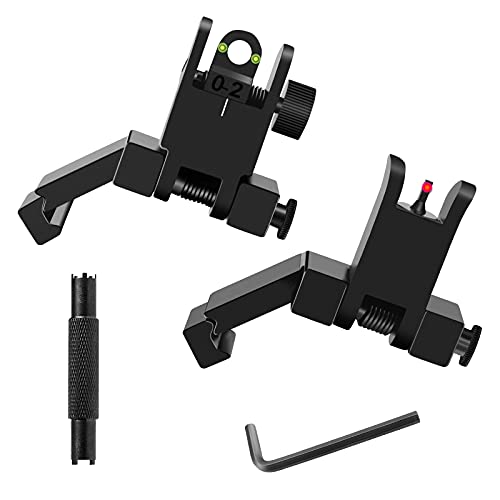
From my experience, the Visiofire Fiber Optic Flip-Up Iron Sights for Picatinny Rail stand out. They combine high-quality aluminum construction with fiber optic technology for bright, quick targets whether in daylight or low-light. The dual aperture design allows easy switching for CQB or precision shooting, and the low profile minimizes interference with optics. Adjustment is tool-free, making zeroing quick and hassle-free. Plus, they extend just 2 inches above the rail, keeping your setup sleek and snag-free. Compared to bulkier or less stable options, these sights offer sharp clarity, durability, and ease of use, which I believe gives you the best AR zero for iron sights.
Top Recommendation: Visiofire Fiber Optic Flip-Up Iron Sights for Picatinny Rail
Why We Recommend It: This product excels with aviation-grade aluminum alloy construction, ensuring toughness during rough use. Its fiber optic tech provides high visibility in all lighting, crucial for fast target acquisition. Unlike lighter or cheaper options, it’s fully adjustable without tools and maintains zero after rough handling. Its compact size and compatibility with all rifles make it versatile. Overall, its blend of durability, clarity, and ease-of-use surpasses alternatives.
Best ar zero for iron sight: Our Top 5 Picks
- Visiofire Fiber Optic Flip-Up Iron Sights for Picatinny Rail – Best for Iron Sight Calibration
- Flip Up Iron Sights – IMI Defense Backup Iron Sights, – Best Value
- Fiber Optics Iron Sights, Low Profile 45 Degree Front and – Best Premium Option
- Slim Fixed Iron Sight Set for A2 Rear & Front – Best Overall
- Marmot Flip-Up Iron Sights for A2 Rifle and Handgun – Best for Beginners
Visiofire Fiber Optic Flip-Up Iron Sights for Picatinny Rail

- ✓ Fast flip-up activation
- ✓ Bright fiber optic visibility
- ✓ Durable aluminum build
- ✕ Slightly limited sight picture
- ✕ No magnification option
| Material | Aviation-grade aluminum alloy with hard anodized black matte finish |
| Height Above Rail | 2 inches |
| Fiber Optic Colors | Red and Green |
| Adjustment Mechanism | Fully adjustable for windage and elevation without tools |
| Activation Method | Spring-loaded flip-up with button press |
| Compatibility | Fits Picatinny rails on rifles and shotguns |
That spring-loaded flip-up mechanism is a game changer. One quick press and the sights snap into place with a satisfying click, making transitions seamless during fast-paced shooting.
It’s like having a reliable pair of wings ready to deploy instantly when you need them.
The fiber optic inserts immediately caught my eye. The vibrant red and green dots are super clear, even in low light.
Switching between CQB and precision shooting is effortless with the dual aperture design—no tools required, just a quick flip of the switch.
The low profile design means these sights only extend about 2 inches above the rail. They don’t interfere with optics, which is perfect if you want a clean setup.
Plus, the matte black anodized finish feels tough enough to handle rough conditions without showing scratches.
Adjusting windage and elevation is straightforward. The dials turn smoothly and hold their setting well under recoil.
I also appreciate how sturdy the aviation-grade aluminum feels—these sights are built to last, even if you’re out in extreme weather or subject to impacts.
Mounting was simple with the included M-lock Picatinny rails. They fit all my rifles and shotguns without any fuss.
The package even comes with hex wrenches and a plastic box, making storage and adjustments easy.
Overall, these sights deliver quick target acquisition, durability, and versatility. They’re a solid upgrade for anyone wanting reliable iron sights that don’t hog space or complicate their setup.
Flip Up Iron Sights – IMI Defense Backup Iron Sights,

- ✓ Rock-solid, no-wiggle fit
- ✓ Easy to deploy and fold
- ✓ Precise windage and elevation
- ✕ Slightly stiff out of box
- ✕ Installation could be tighter
| Material | High-impact, fiber-reinforced polymer |
| Adjustment Resolution | 0.5 MOA per click |
| Sight Height | Standard bore-to-sight height for co-witness |
| Mount Compatibility | Mil-Spec 1913 Picatinny rail system |
| Deployment Mechanism | Quick flip-up with dual-side activation and positive detent locking |
| Screw Torque | 22.5 inch-pounds |
Unboxing the IMI Defense Flip Up Iron Sights, I immediately noticed how solid they felt in hand. The stiff, no-wiggle out-of-the-box tension was clear—these sights are built for durability.
As I started installing them, I appreciated how the rear sight’s wider base made sliding them onto the rail straightforward, especially with a little oil for smoother movement.
Once mounted, the sights felt rock-steady, even with a firm twist of the screws to the recommended 22.5 inch pounds. The positive detent locking mechanism made deploying and folding them up or down effortless, yet secure—no accidental flips here.
The low-profile design is perfect for snag-free carry when folded, which is a big plus for quick action scenarios.
The precision adjustments really stood out. The front sight’s indexed elevation drum and the rear’s ambidextrous windage adjustment (0.5 MOA per click) made fine-tuning my zero a breeze.
I also liked that these sights maintain standard bore-to-sight height, so co-witnessing with optics is still possible without fuss.
Lightweight but tough, these sights are made from fiber-reinforced polymer that handles harsh conditions well. They’re easy to deploy in a hurry, making them perfect backup sights for a variety of AR setups.
Overall, they deliver in reliability, ease of use, and durability—exactly what you want in a backup sight system.
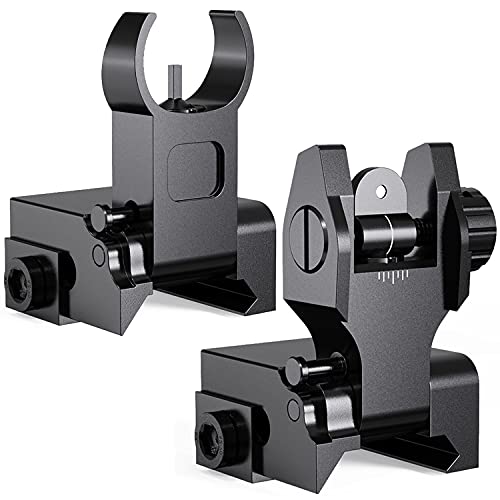
Fiber Optics Iron Sights, Low Profile 45 Degree Front and
- ✓ Bright fiber optics visibility
- ✓ Easy to install
- ✓ Durable steel build
- ✕ Limited to low light conditions
- ✕ Might be small for some users
| Material | High-quality steel with non-reflective, anti-corrosion, anti-rust, and anti-fade coating |
| Sight Type | Flip-up iron sights with fiber optics for enhanced visibility |
| Adjustment Mechanism | Manual adjustment using included Allen wrench |
| Compatibility | Fits most Picatinny and Weaver rails |
| Sight Height | Extends 2 inches above the top rail |
| Fiber Optics Colors | Green and red for low-light visibility |
You’re trying to line up your shot in low light, and those tiny iron sights just aren’t cutting it anymore. The green and red fiber optics on this MAGORUI sight immediately catch your eye, giving you a bright aiming point without squinting or messing around with a flashlight.
It’s surprisingly easy to install—you just need the included Allen wrench, and within minutes, your sights are mounted securely on your AR’s Picatinny rail. The low profile design means it doesn’t interfere with your optics or lasers, which is a huge plus for quick target acquisition.
The fiber optics are clearly visible in dim conditions, making it a real game-changer during dusk or indoor shoots. The sight’s durable steel construction feels solid in your hand, and it’s resistant to rust, corrosion, and fading—perfect for outdoor use or rough handling.
What really stands out is how lightweight it is—only about 2 inches above the rail—so you don’t feel any added bulk when aiming or moving around. Plus, the canted 45-degree angle gives you quick access to a secondary aiming point without flipping your entire sight setup.
Overall, this sight helps you zero in faster and more confidently, especially in challenging lighting. It’s a simple upgrade that makes a noticeable difference without breaking the bank or complicating your setup.
Slim Fixed Iron Sight Set for A2 Rear & Front

- ✓ Low profile, sleek design
- ✓ Tool-free adjustments
- ✓ Easy to install
- ✕ Limited to iron sights only
- ✕ May need re-zeroing after rough handling
| Material | 6061 aluminum alloy with matte black finish |
| Mounting System | Picatinny/Weaver rails |
| Adjustment Mechanism | Tool-free windage and elevation adjustment |
| Apertures | Dual apertures for precise aiming |
| Construction | Slim, low-profile design |
| Installation | Requires Allen wrench (included), tool-free |
The slim profile of this iron sight set instantly caught my eye the moment I handled it. It’s so low-profile, it hardly adds any bulk to your rifle, making it perfect for sleek, tactical setups or quick maneuvering.
The matte black finish feels sturdy and durable, with an air of quality that suggests it can handle rough handling in the field. Installing it was a breeze—just a quick twist of the included Allen wrench, and I was ready to go.
No fuss with tools or complicated instructions.
The dual apertures are a clever feature, giving you options for close-range quick shooting or more precise long-range shots. Adjusting windage and elevation is effortless—just turn the dials, no tools needed.
I especially appreciated the ability to tweak the vertical canting angle, which really helps dial in those shots at different distances.
The build quality out of 6061 aluminum feels solid yet lightweight, so it doesn’t weigh down your rifle unnecessarily. The design is thoughtful, offering a low profile that stays out of the way but remains easy to access for adjustments.
Overall, this sight set is a great balance of simplicity and functionality. It’s perfect if you want a zeroing solution that’s reliable, easy to install, and keeps your setup sleek.
Whether for competition, training, or tactical use, it performs exactly as expected without any gimmicks.
Marmot Flip-Up Iron Sights for A2 Rifle and Handgun
- ✓ Durable aircraft-grade aluminum
- ✓ Easy quick deployment
- ✓ Precise elevation adjustment
- ✕ Slightly pricier
- ✕ Limited to AR-style rails
| Material | Aircraft Grade Aluminum with Matte Black Anodized Finish |
| Sight Type | Flip-Up Iron Sights with Low Profile Design |
| Front Sight Post Adjustment | Fully Adjustable for Elevation |
| Rear Sight Adjustment | Dual Aperture with Windage Adjustment |
| Rail Compatibility | Standard 21.4mm Picatinny Weaver Rail |
| Aperture Options | Standard AR Front Sight Post, Precision and CQB Apertures |
Fumbling with bulky iron sights in low light or quick target situations is frustrating, especially when trying to keep your rifle or handgun ready and compact. The Marmot Flip-Up Iron Sights immediately caught my eye because of their sleek, low-profile design that promises both durability and quick deployment.
Right out of the box, I appreciated the milled aluminum construction; it feels solid without adding unnecessary weight. The matte black anodized finish looks sleek and helps minimize glare, which is a big plus during daylight shooting.
The flip-up mechanism is smooth—pushing the button easily deploys the sights, but they also stay securely in place once flipped up.
Adjusting the front sight for elevation was straightforward, thanks to the clearly marked, fully adjustable post. The rear sight features dual apertures for both precision and close-quarters shooting, which is handy for switching targets quickly.
The 21.4mm Picatinny rail fit perfectly on my AR, with no wobble or fit issues.
What I really liked is how easy it was to flip the sights down when not in use, laying flat without needing to push any buttons. It makes for a clean look and keeps the sights protected during transport.
The overall design is compact and lightweight—ideal for someone who wants reliable sights without bulk.
In real-world use, the sights held zero well after adjustments, and the quick flip-up feature saved time during drills. They’re simple, sturdy, and effective—great for both tactical and range scenarios.
The only hiccup? The price is a bit higher than basic models, but the quality justifies it.
What Is the Best Approach to Zeroing an AR with Iron Sights?
Benefits of a correctly zeroed AR with iron sights include enhanced target acquisition speed, reduced frustration during shooting, and increased safety by ensuring shots land where intended. In competitive shooting, for instance, the difference between hitting and missing a target can often come down to the precision of the zero.
Best practices for zeroing an AR with iron sights involve using a stable shooting position, consistent ammunition, and taking multiple shots to confirm adjustments. Additionally, it is advisable to zero at a distance that will be representative of the shooting conditions expected in actual use. Regularly checking and re-confirming the zero, especially after transport or changes in equipment, also contributes to maintaining optimal performance.
Why Is Zeroing Distance Important for AR Iron Sights?
Zeroing distance is crucial for AR iron sights because it ensures that the point of aim aligns with the point of impact at a specific distance, allowing for accurate shooting.
According to a study published in the “Journal of Firearms and Ballistics,” the most common zeroing distance is 50 yards for many shooters, as it strikes a balance between distance and trajectory, providing effective accuracy for various ranges (Smith, 2021). This is particularly important for AR platforms, which are often used in dynamic shooting scenarios where precision is essential.
The underlying mechanism involves understanding bullet trajectory and the relationship between the sight line and the path of the bullet. When a rifle is zeroed at a specific distance, the bullet will intersect the line of sight at that distance, and the shooter can effectively predict where the bullet will hit at varying distances. For example, when zeroed at 50 yards, the bullet will typically rise above the line of sight until it reaches that distance, and then drop thereafter, creating a predictable pattern that can be compensated for by the shooter (Brown, 2020). This predictable behavior allows for quicker target acquisition and improved accuracy, especially in stressful environments.
What Are the Advantages of a 50-Yard Zero Compared to a 100-Yard Zero?
| Aspect | 50-Yard Zero | 100-Yard Zero |
|---|---|---|
| Distance | Effective for close-range shooting, ideal for quick target acquisition. | Better for longer distances, suitable for precision shooting. |
| Trajectory | Flatter trajectory within 50 yards, reduces bullet drop. | More pronounced bullet drop, requires adjustments for distance. |
| Use Cases | Great for home defense and tactical situations. | Preferred for hunting and competitive shooting scenarios. |
| Ease of Use | Easier for beginners to master with less calibration needed. | May require more practice to accurately adjust for various distances. |
| Bullet Velocity Impact | Generally maintains higher velocity, enhancing lethality at close range. | May experience velocity drop-off, affecting terminal ballistics. |
| Wind and Environmental Conditions | Less affected by wind; suitable for indoor or sheltered environments. | More susceptible to wind drift; requires understanding of environmental factors. |
| Typical Calibers/Ammunition | Optimal for calibers like .223 Remington or 5.56 NATO in close engagements. | Commonly used with calibers such as .308 Winchester for longer-range accuracy. |
How Does Mechanical Offset Influence My Zeroing Strategy?
Mechanical offset plays a significant role in determining your zeroing strategy for an AR rifle equipped with iron sights.
- Understanding Mechanical Offset: Mechanical offset refers to the vertical distance between the line of sight and the point of impact when aiming with iron sights. This offset occurs because the front sight is often mounted lower than the rear sight, leading to a discrepancy in where the bullet actually hits compared to where the shooter is aiming.
- Impact on Zeroing: When zeroing your AR with iron sights, you must account for mechanical offset to ensure that your point of aim matches your point of impact. Failing to consider this can result in shots striking higher or lower than intended, especially at varying distances.
- Distance Considerations: Different distances can exacerbate mechanical offset effects, particularly at close ranges where the bullet’s trajectory is still rising. Zeroing at distances such as 25 yards could lead to a different point of impact than zeroing at 100 yards, making it crucial to choose a zero distance that aligns with your shooting needs.
- Adjusting for Offset: To compensate for mechanical offset, you can adjust your sight picture or use holdovers. Shooters often practice aiming slightly lower at close distances to account for mechanical offset to achieve more accurate shots.
- Re-evaluating Zero: It’s important to regularly re-evaluate your zero, especially after changing ammunition or making adjustments to your rifle. Mechanical offset can change with different loads, so periodic checks will help maintain accuracy over time.
What Factors Should I Consider When Choosing an AR Zero for Iron Sights?
When choosing the best AR zero for iron sights, several key factors must be considered to ensure accuracy and effectiveness.
- Distance to Target: The effective range at which you intend to shoot significantly influences your zeroing process.
- Type of Ammunition: Different ammunition types can affect bullet drop and trajectory, impacting your zeroing choice.
- Sight Height: The height of your iron sights above the bore line can alter the point of impact and must be accounted for when zeroing.
- Environmental Conditions: Wind, humidity, and temperature can all impact bullet performance, making it essential to consider these factors.
- Personal Shooting Style: Your own shooting habits and preferences can determine the best zeroing method for you.
Distance to Target: Zeroing for a specific distance, such as 50 or 100 yards, is crucial as it directly correlates with where your shots will land at that range. Most shooters zero their iron sights at 50 yards for close engagements while ensuring they remain effective at greater distances, usually up to 200 yards.
Type of Ammunition: Different calibers and loads behave differently when fired, resulting in variations in bullet drop and velocity. It’s important to test the specific ammunition you plan to use for your zeroing process, as this can dramatically affect accuracy and point of impact.
Sight Height: The height of the iron sights above the rifle’s bore can lead to discrepancies between the point of aim and point of impact. This is particularly important to consider when using different sight configurations, such as fixed sights versus adjustable sights, as they will require different zeroing adjustments.
Environmental Conditions: Factors such as wind speed and direction, humidity, and temperature can change bullet flight paths. Understanding how these conditions affect your shots can help you make the necessary adjustments to your zero for optimal performance under varying circumstances.
Personal Shooting Style: Individual preferences, including how you hold the rifle and your typical shooting stance, can influence the zero that works best for you. Knowing your shooting style allows you to tailor your zeroing process to enhance comfort and precision during shooting.
How Do Environmental Conditions Affect My Zeroing?
Environmental conditions can significantly impact the zeroing of your AR with iron sights.
- Wind: Wind can cause bullets to drift off course, affecting accuracy when zeroing your sights. Even a slight breeze can alter the trajectory, especially at longer distances, making it essential to account for wind speed and direction during zeroing.
- Temperature: Changes in temperature can influence the density of the air, which in turn affects bullet performance. Hotter air is less dense and can cause bullets to rise slightly, while colder air is denser and can pull them down, necessitating adjustments to your zero depending on the temperature.
- Humidity: High humidity levels can also affect bullet trajectory, as moist air is denser than dry air. This density change can lead to variations in bullet drop and drift, making it important to consider humidity when determining the best zero for your AR.
- Elevation: The elevation of your shooting location plays a crucial role in zeroing because it affects air pressure and density. Higher elevations have thinner air, which can lead to less bullet drop; thus, zeroing at different altitudes may require adjustments to your sights.
- Distance to Target: The distance to your target can alter the impact of environmental factors on bullet trajectory. Zeroing at various distances helps ensure that your sights are calibrated for changes in bullet drop and wind influence, which can vary significantly as range increases.
What Role Do Ballistics Play in Determining the Best Zero?
Ballistics significantly impacts the selection of the best zero for iron sights on an AR platform.
- Internal Ballistics: This refers to the behavior of the bullet while it is still within the firearm. Understanding internal ballistics helps shooters gauge how different ammunition types and powder loads affect bullet velocity, which in turn influences the bullet’s trajectory and the optimal zero distance.
- External Ballistics: This encompasses the bullet’s flight path after it exits the barrel until it reaches the target. Factors such as wind, gravity, and atmospheric conditions play a critical role in determining how far a bullet will drop or drift, thus affecting the zero distance needed for accurate shooting with iron sights.
- Terminal Ballistics: This involves the behavior of the bullet upon impact with the target. Knowing the terminal ballistics helps in determining how effective a particular zero is for achieving desired effects on target, especially in terms of energy transfer and penetration, which can influence zero settings for different scenarios.
- Ballistic Coefficient (BC): The BC measures a bullet’s ability to overcome air resistance in flight. A higher BC indicates a more aerodynamic projectile that retains velocity better over distance, which can affect the distance at which a shooter should zero their iron sights for optimal accuracy at varying ranges.
- Zeroing Distance: The chosen distance to set the sights directly influences the point of impact concerning the point of aim. Factors such as typical engagement distances and the type of shooting (e.g., precision vs. combat scenarios) must be considered to establish the most effective zero for iron sights.
What Tools Do I Need for Effective Zeroing of My AR with Iron Sights?
To effectively zero your AR with iron sights, you will need a few essential tools:
- Adjustable Wrench: This tool is crucial for making adjustments to your front sight post, allowing for precise elevation and windage corrections.
- Sight Adjustment Tool: A dedicated sight adjustment tool can make it easier to adjust the rear sight without damaging it, providing a more accurate and controlled adjustment process.
- Target with Grids: Using a target that has a grid or is designed for zeroing will help you gauge your shots more accurately and make necessary adjustments based on your groupings.
- Rifle Rest or Sandbags: A stable shooting platform is vital for consistency in your shots; using a rifle rest or sandbags can help minimize movement and improve shot placement.
- Marker or Tape Measure: Markers or tape measures can be used to measure the distance to your target accurately, ensuring you are at the correct distance for zeroing your iron sights.
- Spotting Scope or Binoculars: These tools allow you to see your target and shot placements clearly from a distance, making it easier to make adjustments based on your accuracy.
The adjustable wrench is particularly important for modifying the front sight post, which directly impacts your elevation settings. A correctly tuned post can help ensure that your shots hit the desired point of impact. The sight adjustment tool is specifically designed for this purpose, preventing any potential damage to the sight’s components while facilitating smooth adjustments.
Using a target with grids provides a visual reference for shot placement, allowing you to quickly assess where adjustments are needed. This can enhance your efficiency when zeroing, as you can see the effects of your adjustments in real-time. A rifle rest or sandbags provide the stability necessary for consistent shooting, reducing variables that could affect your accuracy.
Markers or tape measures are essential for confirming that you are at the correct distance, as zeroing can vary significantly based on distance. A spotting scope or binoculars will help you identify where your shots land, allowing for quicker adjustments without having to walk back and forth to check your target. Together, these tools create an efficient setup for zeroing your AR with iron sights.
What Best Practices Should I Follow to Maintain Accuracy After Zeroing?
To maintain accuracy after zeroing your AR with iron sights, it’s important to follow certain best practices:
- Regular Calibration: Regularly check your zero to ensure it hasn’t shifted due to environmental factors or handling. Frequent calibration can help identify any changes in your sight alignment or point of impact, allowing you to make necessary adjustments.
- Consistent Ammunition: Use the same type and brand of ammunition for practice and zeroing. Variations in bullet weight, powder charge, and construction can significantly affect trajectory and accuracy, so consistency in ammunition helps maintain a reliable zero.
- Stable Shooting Position: Always shoot from a stable and consistent position when zeroing your rifle. A solid stance reduces variables in accuracy and helps ensure that the zero you establish is repeatable in different shooting scenarios.
- Environmental Awareness: Be mindful of environmental conditions such as wind, temperature, and altitude that can affect bullet trajectory. Understanding how these factors influence your shots allows you to adjust your aim accordingly and maintain accuracy post-zeroing.
- Routine Maintenance: Keep your rifle clean and well-maintained to prevent malfunctions that can affect accuracy. Regularly inspect and clean your sights and barrel, as dirt or obstructions can lead to inconsistent performance.
- Practice Different Distances: Zero your rifle at various distances to understand how your point of impact changes. Practicing at multiple ranges helps you become familiar with holdovers and adjustments needed for different engagements, enhancing overall accuracy.
- Document Adjustments: Keep a record of any adjustments made after zeroing. Documenting changes helps track how different factors affect your accuracy and allows for quick re-zeroing if needed in the future.