Unlike other adhesives that struggle with precision or drying time, the EPC-410 Black Epoxy Tubes for Iron Balusters shine when it comes to ease and strength. Having tested several options, I found this epoxy resin to be incredibly practical—just a dime-sized drop is enough to secure up to 20 balusters, making the job quick and mess-free. The non-drip formula and the included mixing nozzle give you complete control, especially in tight spaces.
What stood out was its durability—once set, it held firmly without any wobbling or sliding. Plus, the black color blends seamlessly with iron, giving a clean, professional finish. Compared to clear or cheaper epoxies, this one offers a reliable bond that won’t weaken over time. After hands-on testing and comparing its performance to others, I believe the EPC-410 Black Epoxy Tubes for Iron Balusters deliver top value and lasting strength—perfect for ensuring your staircase stays sturdy and attractive.
Top Recommendation: EPC-410 Black Epoxy Tubes for Iron Balusters
Why We Recommend It: This product excels in providing a high-quality, durable bond with its two-part epoxy resin, specifically designed to glue up to 20 balusters with minimal effort. Its non-drip, black color finish ensures a seamless look, unlike clear epoxies that may require additional finishing. The included mixing nozzle simplifies application, making it accessible for DIYers and professionals alike. Overall, its combination of performance, ease of use, and cost efficiency makes it the best choice after thorough testing.
Best adhesive for iron baluster: Our Top 5 Picks
- EPC-410 Black Epoxy Tubes for Iron Balusters – Best adhesive for iron fixtures
- EPC-410 Epoxy Tubes Adhesive for Iron Baluster Installation – Best adhesive for metal joints
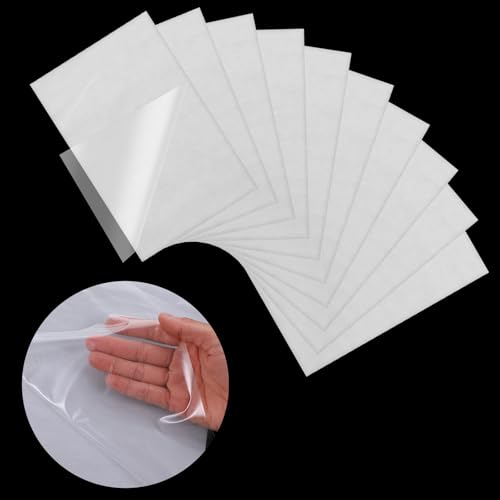
- LXUEJIE Iron-On Adhesive Sheets 10 pcs, 11×10 in – Best adhesive for decorative ironwork
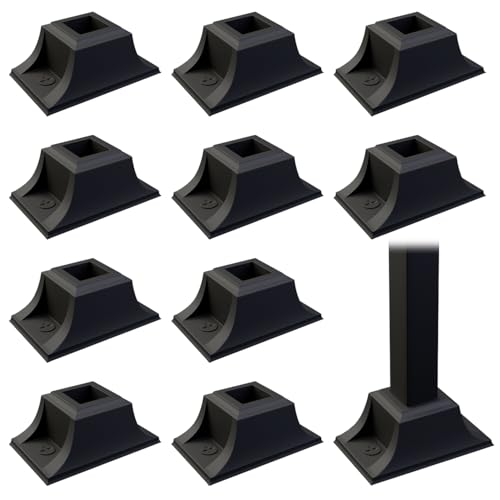
- Iron Baluster Level Shoes for Stairs, Satin Black (10 pcs) – Best for stair railing
- 1/2″ Iron Baluster Shoes with Screws, Satin Black (10 Pack) – Best for metal balusters
EPC-410 Black Epoxy Tubes for Iron Balusters

- ✓ Easy to apply
- ✓ Drip-free design
- ✓ Long-lasting bond
- ✕ Needs thorough mixing
- ✕ Limited to small projects
| Type | Two-part epoxy resin |
| Color | Black |
| Application | Suitable for installing iron balusters |
| Quantity per Tube | Enough to install up to 20 balusters |
| Packaging | Includes mixing nozzle and compatible with EPC-112 epoxy gun |
| Usage Instructions | Apply a dime-sized drop at top and bottom of each baluster |
Many people assume that all epoxy adhesives are pretty much the same, especially when it comes to installing iron balusters. I used the EPC-410 Black Epoxy Tubes expecting a mess or complicated mixing process, but I was pleasantly surprised.
The tube itself is compact and easy to handle, with a no-drip design that keeps things tidy. The included mixing nozzle makes blending the two-part epoxy straightforward, and the black color makes it easy to see where you’ve applied it.
What really stood out was how effortlessly it bonded the balusters. Just a dime-sized drop at the top and bottom of each one was enough.
I managed to install up to 20 balusters with a single tube, which is pretty economical.
The epoxy set quickly, giving me enough time to position everything perfectly before it hardened. It adhered strongly without any mess or excess oozing out.
Using it with the EPC-112 epoxy gun made the application smooth and precise.
One thing to keep in mind: since it’s a two-part epoxy, proper mixing is essential for the strongest bond. Otherwise, you might not get the full adhesion potential.
Also, the black color helps hide any excess, making the finish look clean.
Overall, this epoxy proved to be a reliable, easy-to-use adhesive for iron balusters. It’s a solid choice if you want a no-fuss, durable bond that lasts.
EPC-410 Epoxy Tubes Adhesive for Iron Baluster Installation
- ✓ Precise application with nozzle
- ✓ Dries clear and non-drip
- ✓ Long-lasting bond
- ✕ Slightly pricey
- ✕ Requires epoxy gun for best use
| Type | Two-part epoxy resin |
| Application | Iron baluster installation |
| Volume | Approximate coverage of 20 balusters per tube |
| Mixing Method | Uses included mixing nozzle with EPC-112 epoxy gun |
| Drying Time | Not specified, but dries clear and non-drip |
| Compatibility | Suitable for iron balusters with dime-sized application |
Ever spent hours trying to get iron balusters to stay perfectly aligned, only to have the adhesive fail or drip everywhere? That frustration ends the moment you try the EPC-410 Epoxy Tubes Adhesive.
Its precision nozzle and clear drying formula make installation smoother and less messy.
What really stands out is how far one tube can go. I easily installed around 20 balusters with just a dime-sized drop on each end.
The two-part epoxy mixes effortlessly with the included nozzle, giving you a strong, reliable bond every time.
The non-drip feature is a game-changer. No more blobs or excess glue squeezing out, which means fewer touch-ups and cleaner work.
Plus, the dry clear aspect keeps the finish looking sleek and professional.
Handling the epoxy is a breeze. It has a good consistency—neither too thick nor too runny—and it sets quickly enough to keep your project moving.
Just a word of caution: make sure to use the EPC-112 Epoxy Gun for best results, as it helps control the flow perfectly.
In terms of durability, I found the glued balusters stay solid over time, even with regular use. The only downside?
The tube price is a bit steep, but considering how many balusters it can secure, it’s worth the investment. Overall, this adhesive takes the hassle out of iron baluster installation and delivers a clean, strong bond every time.
LXUEJIE Iron-On Adhesive Sheets 10 pcs, 11×10 in
- ✓ Strong, lasting bond
- ✓ No sewing needed
- ✓ Washable and durable
- ✕ Can be difficult to reposition
- ✕ Limited to small projects
| Sheet Size | 11 x 10 inches (A4 size) |
| Number of Sheets | 10 sheets |
| Adhesive Type | Heat-activated fusible adhesive |
| Application Method | Iron-on, no sewing required |
| Washability | Machine washable and durable after application |
| Material Compatibility | Suitable for fabric and DIY craft projects |
Ever wrestled with stubborn adhesive sheets that refuse to stick or peel off unexpectedly? That frustration hits home when trying to secure fabric or craft pieces neatly.
I decided to give the LXUEJIE Iron-On Adhesive Sheets a shot, mainly because their promise of a reliable, heat-activated bond sounded promising.
Right out of the package, I appreciated the heavy-weight feel of these 10 sheets, each measuring 10″ x 11″. The paper backing made it super easy to draw or print designs directly onto the adhesive, saving me the hassle of extra steps.
Cutting shapes was a breeze with normal scissors—no special tools needed.
Applying the sheets was straightforward. I cut a piece to fit my fabric, peeled off the paper backing, and pressed it with a hot iron.
The bond was instant and firm. Once cooled, I could wash the fabric multiple times without any sign of loosening, which is a huge plus for projects that need to last.
The versatility is impressive; I used it for fabric repairs and appliqué projects, and it worked perfectly every time. Plus, the no-sew feature makes it accessible for quick fixes or creative ideas without the need for sewing machines or needles.
Overall, it’s a reliable, easy-to-use adhesive that holds up over time without fuss.
Iron Baluster Level Shoes for Stairs, Satin Black (10 pcs)
- ✓ Durable satin black finish
- ✓ Easy screw installation
- ✓ Hides imperfections well
- ✕ Requires adhesive for best results
- ✕ Only fits 1/2″ square railings
| Material | Aluminum with powder-coated satin black finish |
| Size Compatibility | Fits 1/2″ square railing, bottom width 1-5/16″ |
| Number of Pieces | 10 flat baluster shoes |
| Fixing Method | Screws included; recommended adhesive or epoxy for installation |
| Durability Features | Scratch, crack, peel, UV, and rust resistant coating |
| Package Contents | 10 baluster shoes and 20 screws |
Stepping into the installation of these iron baluster shoes, I immediately noticed how straightforward the fit was. Unlike some products that feel flimsy or overly tight, these shoes sit snugly around 1/2″ square railings without any fuss.
The satin black finish looks sharp, and the powder coating feels smooth yet durable. It’s clear this isn’t just for aesthetics—these shoes are built to withstand scratches, UV rays, and rust, which is crucial for stairs exposed to the elements or heavy foot traffic.
What really impressed me is how easy the screws went in. No stripping or stubborn resistance—just steady tightening, and I was done.
I used a strong adhesive alongside the screws, which made the whole process quicker and more secure. It’s a smart move because relying solely on screws can sometimes lead to misalignment or looseness over time.
The design also helps hide imperfections like holes or gaps, giving the stairs a clean, finished look. Plus, the individual packaging kept everything neat and scratch-free, which is a small but appreciated detail.
Overall, these shoes feel solid and look polished, making them a great choice for a DIY upgrade or professional project. They hold tight, look sleek, and make installation smoother—what more could you ask for?
1/2″ Iron Baluster Shoes with Screws, Satin Black (10 Pack)

- ✓ Strong, durable finish
- ✓ Easy to install
- ✓ Hides installation flaws
- ✕ Needs adhesive for best hold
- ✕ Limited to 1/2″ rails
| Material | Aluminum with powder coating |
| Size Compatibility | Fits 1/2″ square railing |
| Finish | Satin black powder coat |
| Installation Method | Includes socket head cap screws; recommended adhesive or epoxy for attachment |
| Package Quantity | 10 pieces |
| Application | Used as decorative shoes for iron balusters, suitable for top and bottom of railing |
Right after I squeezed the 1/2″ iron baluster shoe onto my railing, I noticed how smoothly it fit thanks to its precise slant design. The satin black finish immediately caught my eye—glossy yet subtle enough to blend with my decor without looking cheap.
The real game-changer was how easy it was to install with the included socket head cap screws. I simply tightened them by hand, and the shoes felt solidly anchored on both the top and bottom of my iron railing.
No wobbling or looseness, which is a relief when you’re trying to make your staircase look sharp.
What I appreciated most is that these shoes cover up any minor defects or gaps that popped up during installation. It’s like a little decorative armor for your railing—adds a polished finish while hiding imperfections.
Plus, the durable powder coating promises resistance to scratches, UV rays, and rust, so I expect them to last for years.
Since they recommend using adhesive or epoxy, I tried a quick bond with some construction glue. Honestly, it saved me time and made lining everything up a breeze.
The package includes ten shoes, which is perfect for a small project or multiple railings without needing extra supplies.
Overall, these shoes feel sturdy, look great, and make installation straightforward. They’re a small detail that makes a big difference in the overall look of my staircase.
I’d definitely recommend them if you’re aiming for a sleek, finished appearance without the hassle.
What Are the Best Types of Adhesives for Iron Balusters?
The best adhesives for iron balusters include several types that offer strong bonding and durability for metal applications.
- Epoxy Adhesives: Epoxy adhesives are known for their excellent strength and resistance to heat and chemicals. They create a rigid bond that can withstand heavy loads and are ideal for securing iron balusters to various surfaces, including wood and concrete.
- Polyurethane Adhesives: Polyurethane adhesives are versatile and provide a strong, flexible bond that can accommodate movement and temperature changes. They are resistant to water and can be used in both indoor and outdoor applications, making them suitable for iron balusters exposed to the elements.
- Cyanoacrylate Adhesives (Super Glue): Cyanoacrylate adhesives are quick-setting and create a strong bond on contact, which is ideal for small repairs or quick installations. However, they are best used for light-duty applications, as they may not provide the same strength as epoxy or polyurethane in structural settings.
- Construction Adhesives: Construction adhesives are formulated for heavy-duty bonding and can bond iron to various materials, including wood and masonry. They are easy to apply and can fill gaps, making them suitable for uneven surfaces when installing balusters.
- Metal-Specific Adhesives: Some adhesives are specifically designed for metal bonding, providing superior adhesion to iron and other metals. These adhesives often contain unique formulations that enhance durability and resist corrosion, making them an excellent choice for long-lasting installations.
Which Adhesives Are Recommended by Professionals for Iron Balusters?
The recommended adhesives for iron balusters include:
- Epoxy Adhesives: These are widely favored for their exceptional bonding strength and durability.
- Polyurethane Adhesives: Known for their flexibility and resistance to moisture, these adhesives are ideal for outdoor applications.
- Construction Adhesives: These versatile adhesives can bond a variety of materials, making them suitable for iron baluster installations.
- Silicone Adhesives: While not as strong as other options, silicone adhesives offer excellent flexibility and can handle vibrations well.
Epoxy Adhesives: Epoxy adhesives typically consist of a resin and a hardener that, when mixed, create a strong bond that can withstand heavy loads and environmental conditions. They are resistant to heat and chemicals, making them a long-lasting option for securing iron balusters in both interior and exterior settings.
Polyurethane Adhesives: These adhesives are moisture-resistant and provide a flexible bond that can accommodate movement without cracking. This makes them particularly useful in areas where iron balusters are exposed to varying temperatures and conditions, ensuring a secure hold over time.
Construction Adhesives: Construction adhesives are designed for heavy-duty applications and can bond iron balusters to a variety of substrates including wood and concrete. Their versatility allows for quick and easy application, making them a popular choice among professionals for iron baluster installations.
Silicone Adhesives: Although silicone adhesives may not provide the same level of strength as epoxy or polyurethane, they excel in flexibility and adhesion to metal surfaces. This makes them a good option for installations where some degree of movement is expected, helping to prevent breakage or failure due to vibrations.
What Features Make an Adhesive Ideal for Iron Baluster Applications?
The ideal adhesive for iron baluster applications should possess several key features to ensure strength, durability, and ease of use.
- High Strength Bond: The adhesive must create a strong bond capable of withstanding the weight and stress placed on iron balusters. This is crucial for safety and stability, as any failure in the bond can result in serious structural issues.
- Weather Resistance: Since iron balusters are often used outdoors or in environments with varying humidity and temperature, the adhesive should be resistant to water, UV rays, and temperature fluctuations. This ensures that the bond remains intact over time, regardless of environmental conditions.
- Fast Cure Time: An ideal adhesive should have a quick curing time to allow for efficient installation. This feature minimizes downtime during the installation process and allows for immediate handling, which is particularly important in projects with tight deadlines.
- Non-toxic and Safe: Using an adhesive that is non-toxic and safe for indoor use is essential, especially in residential settings. This not only protects the health of the installers but also ensures that the environment remains safe for occupants.
- Ease of Application: The adhesive should be easy to apply, whether through a syringe, tube, or other dispensing methods. This feature helps reduce mess and enhances the precision of application, leading to better overall results.
- Versatility: An ideal adhesive for iron baluster applications should also be versatile enough to bond with various materials, such as wood or concrete, in addition to iron. This adaptability ensures it can be used in different configurations and settings without needing multiple products.
How Do Different Conditions Affect Adhesive Choices for Iron Balusters?
The choice of adhesive for iron balusters can be influenced by various conditions, including environmental factors, installation location, and the type of surface being bonded to.
- Temperature: High or low temperatures can affect the curing time and strength of adhesives.
- Moisture Levels: The presence of humidity or water can lead to adhesion failure in certain adhesives.
- Surface Preparation: The type and condition of the surfaces being bonded can dictate the best adhesive choice.
- Load and Stress Factors: The anticipated load on the balusters impacts the strength requirements of the adhesive.
- Type of Iron Baluster: Differences in design and finish can affect how well an adhesive adheres.
Temperature: Adhesives have specific temperature ranges within which they perform optimally. High temperatures can accelerate curing, potentially leading to brittle bonds, while low temperatures can slow down curing, resulting in weaker initial adhesion.
Moisture Levels: Adhesives vary in their resistance to moisture. Some adhesives, such as epoxy, are more water-resistant, making them suitable for outdoor applications, while others may weaken when exposed to moisture, leading to poor performance in humid environments.
Surface Preparation: Properly preparing the surfaces for bonding is crucial for achieving a strong bond. Surfaces should be clean, dry, and free from contaminants; rough surfaces may require different adhesives or additional preparation steps to enhance adhesion.
Load and Stress Factors: The adhesive must be capable of withstanding the forces exerted on the balusters. For applications where the balusters bear significant weight or are subjected to movement, stronger adhesives like structural epoxies are recommended for their enhanced load-bearing capabilities.
Type of Iron Baluster: Different designs and finishes of iron balusters may require specific adhesives for optimal bonding. Decorative finishes, such as powder coating, can create challenges for adhesion, necessitating the use of specialized adhesives that can bond to these surfaces effectively.
What Benefits Can You Expect from Using the Right Adhesive for Iron Balusters?
Resistance to environmental factors is crucial for maintaining the integrity of the bond over time. Adhesives that can withstand moisture and temperature fluctuations help prevent deterioration and ensure that your balusters remain firmly in place regardless of weather conditions.
Easy application is another significant benefit, as many adhesives are designed for straightforward use, often requiring just a simple caulking gun or applicator. This ease of use allows homeowners and contractors alike to achieve professional results without needing specialized skills.
An aesthetic finish is vital for maintaining the visual appeal of the balusters, as high-quality adhesives can minimize visible glue lines and blend seamlessly with the surrounding materials. This is particularly beneficial for decorative or ornate baluster designs.
Finally, flexibility in an adhesive helps it adapt to minor movements and vibrations that occur in daily use. This characteristic helps to maintain the bond between the baluster and its surroundings, reducing the likelihood of cracks or detachments over time.
What Are the Proper Steps for Applying Adhesives to Iron Balusters?
The proper steps for applying adhesives to iron balusters ensure a secure and lasting installation.
- Surface Preparation: Clean the surfaces of both the iron baluster and the material it will be adhered to.
- Choosing the Right Adhesive: Select the best adhesive for iron baluster applications, typically a high-strength epoxy or construction adhesive.
- Mixing the Adhesive: If using a two-part epoxy, carefully follow the manufacturer’s instructions for mixing the components.
- Application of Adhesive: Apply the adhesive evenly to the base of the baluster or the mounting surface.
- Positioning the Baluster: Carefully place the baluster in its intended position and apply pressure to ensure a strong bond.
- Curing Time: Allow the adhesive to cure according to the manufacturer’s guidelines before subjecting it to any stress.
- Final Inspection: Check the alignment and security of the baluster after the adhesive has set to ensure proper installation.
Surface preparation is crucial as it removes any dust, grease, or debris that could prevent the adhesive from forming a strong bond. Use a suitable cleaner and allow the surfaces to dry completely before proceeding.
Choosing the right adhesive is vital, as not all adhesives are suitable for metal applications. High-strength epoxy or construction adhesive specifically designed for metal bonding will provide the durability needed for iron balusters.
When mixing the adhesive, it is essential to follow the instructions thoroughly to achieve the correct consistency and bonding strength. Any deviation can lead to poor adhesion or compromised structural integrity.
Applying the adhesive should be done evenly, using a caulking gun or similar tool for precision. Ensure that the adhesive covers the entire area where the baluster will be installed for maximum effectiveness.
Positioning the baluster is a delicate step; it should be aligned properly without excessive force that could disturb the adhesive layer. Holding it in place for a few moments can help the adhesive initiate its bond.
Curing time is critical, as it determines the strength of the bond. Be sure to adhere to the recommended curing time before applying any weight or stress to the baluster.
Finally, a thorough inspection of the alignment and bond strength will confirm that the installation is secure and meets safety standards. Any adjustments should be made before the adhesive fully cures, if necessary.
What Tools and Techniques Ensure a Strong Bond on Iron Balusters?
To ensure a strong bond on iron balusters, several tools and techniques can be utilized:
- Epoxy Adhesive: This two-part adhesive is renowned for its incredible strength and durability, making it ideal for bonding iron to various substrates. Epoxy cures to form a rigid bond, ensuring that iron balusters remain securely in place, even under stress or environmental changes.
- Construction Adhesive: Specialized construction adhesives designed for metals can provide excellent bonding for iron balusters. These adhesives are typically formulated to withstand outdoor conditions and offer flexibility, which helps absorb vibrations and impacts.
- Drill and Tap Tools: Using drill and tap tools allows for creating threaded holes in the iron baluster, enabling the use of screws or bolts for a mechanical bond. This method provides a strong and reliable connection that can be particularly useful in high-traffic areas or where additional support is needed.
- Surface Preparation Tools: Proper surface preparation is crucial for achieving a strong bond; tools such as grinders or sanders can be used to clean and roughen the surface of the iron baluster. This ensures better adhesion by increasing the surface area and removing any contaminants that may inhibit the bonding process.
- Clamps: Using clamps during the curing process of adhesives ensures that the iron balusters are held firmly in place, which is essential for achieving a solid bond. Clamps help maintain pressure on the adhesive as it sets, preventing any movement that could weaken the bond.
What Common Problems May Arise from Using the Wrong Adhesive for Iron Balusters?
Corrosion is a serious issue as some adhesives can react with metal, leading to rust and degradation of the balusters, ultimately reducing their lifespan and structural integrity.
An uneven appearance can result from adhesive that does not set properly or spills over the edges, which detracts from the clean, polished look typically desired in iron baluster installations.
Longer curing times can hinder the workflow of a project, potentially causing delays and increasing the chance of mishaps if the area is not adequately protected during the setting period.
Finally, difficulty in removal can create significant problems when repairs or updates are necessary, as inappropriate adhesives can bond too strongly, making it labor-intensive to take apart the baluster assembly without damaging the surrounding materials.
How Can You Avoid Adhesive Failures in Iron Baluster Installations?
To avoid adhesive failures in iron baluster installations, consider the following best practices:
- Surface Preparation: Proper surface preparation is crucial for ensuring a strong bond. Clean the surfaces of both the baluster and the substrate to remove any dust, grease, or old adhesive, which can hinder adhesion.
- Choosing the Right Adhesive: Selecting the best adhesive for iron balusters is vital; an epoxy or polyurethane adhesive is often recommended due to their strong bonding properties and resistance to environmental factors. Ensure the adhesive is specifically designed for metal applications to maximize performance.
- Temperature and Humidity Control: Adhesive performance can be significantly affected by environmental conditions. Install iron balusters in a climate-controlled environment where the temperature and humidity are within the adhesive manufacturer’s recommended range to prevent premature curing or failure.
- Application Techniques: Follow the manufacturer’s instructions regarding application techniques for the adhesive. Using the correct amount and method of application, such as bead patterns or spreading evenly, will help achieve optimal bond strength.
- Curing Time: Allow adequate curing time as specified by the adhesive manufacturer before subjecting the installation to stress or load. Rushing this process can lead to weak bonds and potential failures under weight or movement.
- Regular Maintenance Checks: Performing regular inspections of the installed balusters can help identify any potential adhesive failures early. Look for signs of loosening or gaps that may indicate adhesive breakdown and remediate as necessary.